• Home
  • Blog
  • Basics + Pantry Staples
  • Preservation
  • Desserts & Sweets
  • Breakfast
  • Entrees & One-dish Meals
  • Salads + Sides
  • Soups & Stews
  • 10 Minute Recipes
  • About
  • Say Hello
  • Portfolio
Menu

of the dirt

Street Address
San Diego, CA
Phone Number
an exploration of food and culture

Your Custom Text Here

of the dirt

  • Home
  • Blog
  • Recipes
    • Basics + Pantry Staples
    • Preservation
    • Desserts & Sweets
    • Breakfast
    • Entrees & One-dish Meals
    • Salads + Sides
    • Soups & Stews
    • 10 Minute Recipes
  • About
  • Say Hello
  • Portfolio

Roasted Carrots with Chopped Mint Dressing

November 30, 2016 Sarah Ward
Roasted-Carrots-with-Mint-Dressing_007_sRGB.jpg

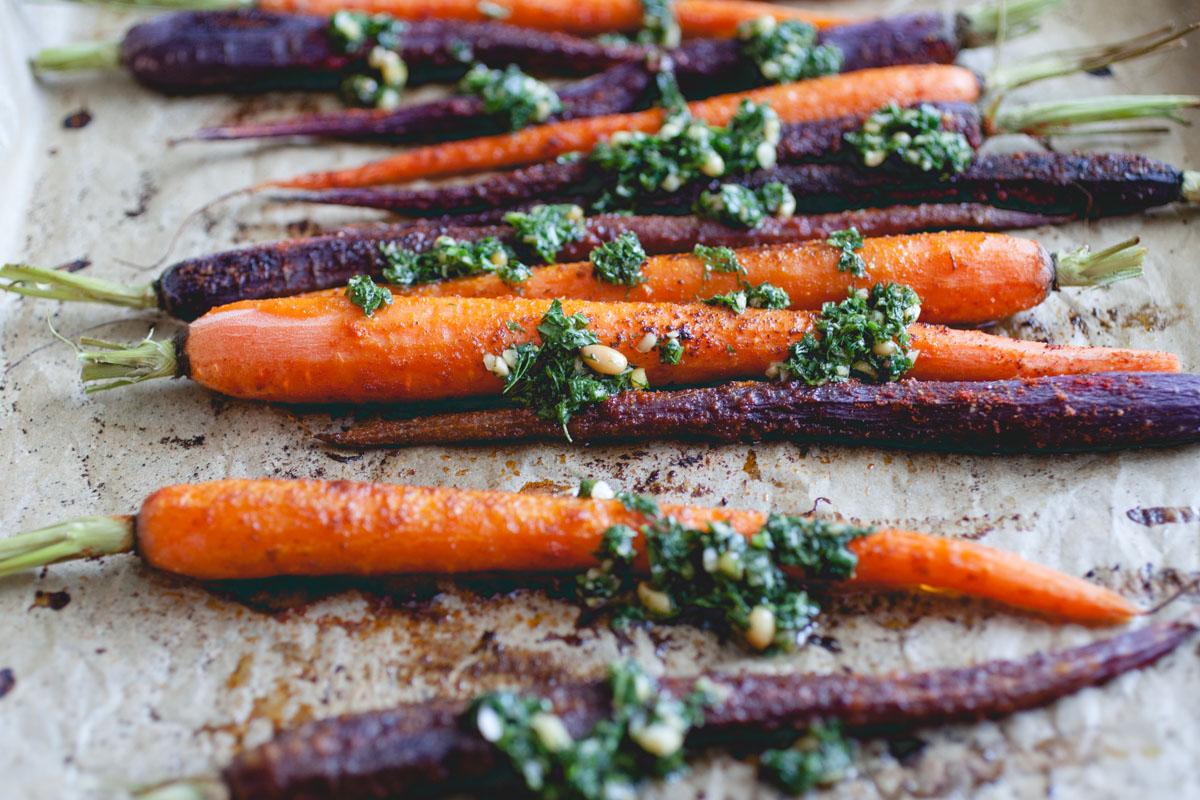
Carrots have been filling the farmers markets around here as of late. Commercially, we are often used to buying carrots in their perfectly cut "baby carrot" form - clean, bagged and ready for snacking.  There is certainly nothing wrong with some convenience, but I can tell you, it's worth the bit of extra time it takes to clean these roots when purchased locally. They are often much sweeter and typically cheaper per volume to buy direct from the farmer. Depending on which region of the country you live, you should see carrots in your farmers market through the start of winter, if not longer. 

Roasting is one of the best ways to bring out and intensify this root’s inner sweetness. Seasoned with a hint of heat that balances nicely with fresh mint dressing, these Roasted Carrots with Chopped Mint Dressing are a tasty, versatile side dish. If you happen to have any leftovers, try chopping up the cold carrots and adding them to a salad.

Find this easy Bonnie Plants recipe here.

In Winter, Fall, Vegetarian, Vegan, Sides, Salads + Sides Tags carrots, mint, roasted vegetables
Comment

Heirloom Apple Pie (create your own family recipe)

November 20, 2016 Sarah Ward
Heirloom Apple Pie_031_sRGB.jpg

To many families, holiday traditions just aren't complete until Grandma's (or Aunt Martha's, or Uncle Pete's) pie has been passed around the table. Like an heirloom, these revered recipes often come to us from generations past and connect us to the larger whole of our family. I grew up with two Southern grandmothers (well, one was technically Cuban but adopted by the south), so my family is certainly not short on heirloom recipes. However, a good holiday pie is conspicuously absent, so this season I set out to create one. I came up with a few tips during this process that I'd like to share so that you can start your own holiday tradition.

How to test your pie flavors 

Ok, I know that the hardest part about putting a pie recipe together can be knowing where to start. It can be so frustrating to put in the work peeling all of those apples and rolling out crust only to end up with flavors that just don't dazzle. My suggestion here is to start with some small-scale tests. Cooking apples with a few different spice mixes on the stovetop is quick and an easy way to experiment without having to commit to a whole pie (side note: this technique is also great for a stand alone dessert on those nights when you wanna be easy but still treat yo'self). I've broken this process down to a few simple steps and put them into a guide to help you organize the process.

  • Download the recipe testing chart (via the button below)

  • Choose a variety of apples to test with - both tart and sweet, soft and firm

  • Get creative with your spices and flavors - this is the perfect time to try things that you might be unsure of how they'll taste. There's a sheet included in the download with a guide to apples and complimenting flavors. Google is a great resource here, as well. Simply search for "Spices (or fruits, nuts, flavors...) that compliment _____" and go from there. `

  • Once you've determined what spices and flavors are your favorite, scale the recipe as denoted on the sheet. The basic formula is below:

    • Measurement of spices/other flavorings used in test x # of apples used in a full pie = Total measurement for a full pie

  • Follow the recipe below for making your full heirloom pie!

Note about scaling: Small scale tests may not always translate perfectly to the full-size version. I recommend trying to use the same size apples in your pie that you tested. Or, given that apples naturally vary in size, premix your spices to your full scale and add them into your apples a teaspoon at a time - this is mostly important for your first full-scale pie. If you track your teaspoon measurements, you can make up a big batch of heirloom pie spices and just list your recipe as "3 tsp of family spice mix." This would be a great thing to keep on hand or give a jar along with the pie recipe to your family as a personalized gift (and win best gift giver of the year).

Recipe Testing Chart (click to download)

Share your family's creation with #heirloomapplepie and #ofthedirtrecipes!


heirloom Apple Pie

  • 5-7 apples (a variety of tart and sweet)

  • 1 tablespoon sugar per apple (half brown, half granulated is recommended, or try coconut sugar)

  • Heirloom Test Recipe spice mixture (or 3-4 tsp spices of choice)

  • 1 tablespoon all-purpose flour or tapioca flour per apple

  • 2 Basic Pie Crusts

  • Egg wash (1 egg beaten with 1 Tbsp water; optional)

  • Sugar for finishing (optional)

  1. Peel, core and slice your apples into ⅛ - ¼” thick slices. Cut into bite-sized pieces or leave whole and place in a large mixing bowl. Add in sugar and spices and toss to coat. If you are using your tested heirloom spices for the first time, it is recommended to add the mix in one teaspoon at a time. Taste an apple slice as you go and stop when you feel it is seasoned to your liking. Cover and let stand for 3 hours or chill overnight. (You can skip this step, but letting the apples macerate will help reduce the amount the fruit shrinks when baking.) Stir flour into apples.

  2. Roll out one disk of pie dough and fill your 9” pie pan. Trim or leave the overhang depending on how you’d like to decorate the crust. Fill your crust with apples, gently pressing them down as you go - this will help them settle and keep your pie from developing a gap between the apples and top crust. Dome apples in the center if they rise above the pan’s edge.

  3. Roll out the second pie dough and cover the top of the apples in any design desired. If covering with a full crust and not a lattice or cut shapes, be sure to cut a few slits in the top for ventilation. Trim edges of dough to about 1-inch beyond the edge of the pan. Fold edges over and crimp as desired. Brush with the egg wash and sprinkle with sugar, if desired. Freeze pie while oven preheats.

  4. Preheat oven to 415F

  5. Place the pie on a lined baking sheet. Bake in the center of your oven for 15 minutes. Reduce the heat to 350F and bake for an additional 45 - 50 minutes. Cool on a rack for a minimum of 30 minutes before serving.

Apple varieties I used in my final pie.

Apple varieties I used in my final pie.

Filling Apple Pie.gif
In Dessert, Fall, Pie, Recipe, Winter, Holiday Recipes Tags pie, Dessert, Apple, Heirloom Recipe, Thanksgiving, Christmas, Holiday Pie
1 Comment

Rhubarb Baked Oatmeal

October 22, 2016 Sarah Ward

My brother and sister-in-law recently returned from Iceland and they came back with a (supposed...eh hem) recipe for a traditional rhubarb and oat pie/cake. Since I have yet to see this recipe I will continue to guilt trip them into sharing it with me....especially if Henry wants me to make it for his birthday! Little-sistering aside, I did some research of my own and found a traditional cake called Happy Marriage Cake using rhubarb, jam and an oatmeal based batter. While I'm never one to shy away from cake for breakfast (because you're actually crazy if you do), it's not always the best life choice. So, I let it influence a heart healthy but still super tasty breakfast recipe.

Baked oatmeal is one of my go-to breakfasts for a crowd. It's also a great thing to make ahead for a quick breakfast during the work week. I will admit, I'm not really a big traditional oatmeal fan. If you're with me on team "I hate eating things that make me feel like a baby bird..." then we probably have similar feelings about oatmeal. Baked oatmeal, however, is a love of mine. It's hearty and chewy and not at all watery or porridge like - it's more like eating Thanksgiving dressing (<-- look it up if you're like "um, what?") or a really giant chewy oatmeal bar. I haven't made it enough lately, but I'm happy to have dug out my oatmeal baking mitts to share something warm and hearty with you! 

If you don't have (or like) rhubarb, you can substitute a ton of different fruits - sliced apples, pears, strawberries, persimmons, plums, blueberries, etc. This recipe calls for milk and an egg, but if you want to make it vegan, you can leave the egg out. The oatmeal will have a bit of a looser texture, but that's about the only real difference. I used unsweetened almond milk for my baked oatmeal and it worked really well. Any kind of dairy, nut or grain milk should do. 

Don't forget: Share your baked oatmeal dishes on Instagram with #ofthedirtrecipe or tag @ofthedirt!


Rhubarb Baked Oatmeal

  • 2-3 large stalks of rhubarb
  • 2 cups rolled oats
  • 1/4 cup coconut sugar (or sweetener of your choice)
  • 1/2 tsp ground cardamom
  • 1 tsp ground cinnamon
  • 2 tsp ground ginger
  • 1/4 tsp kosher salt
  • 2 cups milk (cow, almond, soy, etc.)
  • 1 egg
  • 1/2 tsp almond extract
  • 1 tsp vanilla extract
  • Honey (optional)
  • Chopped fruits and nuts for serving (optional)

Spiced Yogurt

  • 5-6 oz Icelandic skyr or greek yogurt (plain or vanilla)
  • 1/4 tsp ground cardamom
  • 1/4 tsp ground cinnamon
  • 1/4 tsp vanilla extract (optional)
  • 1 Tbsp honey (optional)

Preheat your oven to 350 F.

Cut rhubarb into 1-2" lengths. If your stalks are on the thicker side, carefully cut them in half length wise. This will insure they become tender during baking. Set aside.

Combine rolled oats, cardamom, cinnamon, ginger, sugar and salt in a bowl and stir to thoroughly combine. If you are choosing to use a liquid sweetener like maple syrup or honey rather than sugar, wait to add it into the milk. Pour oats into a 9" round baking dish or small casserole pan and spread even.

Whisk together milk, egg, almond and vanilla extract (and liquid sweetener, if appropriate). Pour over the oats. Arrange the rhubarb slices in any decorative manner you wish. 

Cover the pan tightly with foil and bake for 40 minutes. Uncover and bake for an additional 5 minutes. Remove from the oven and rest for 10 minutes. 

While the oatmeal is baking, mix together skyr, spices, extract and honey. Set aside until ready to serve. This can easily be made ahead of time and kept in the fridge.

Serve a scoop of the baked oatmeal, warm, with a loving dollop of spiced skyr, chopped nuts/fruits and a drizzle of honey. 

Yield: 6-8 servings
Baked Oatmeal_Honey Drizzle_small.gif
Baked Oatmeal with Rhubarb_007_sRGB.jpg
In Breakfast, Fall, Recipe, Spring Tags rhubarb, iceland, oatmeal
Comment

Sweet Potato and Thai Curry Soup

December 5, 2015 Sarah Ward
Red Curry Paste: Not all red curry pastes are created equal. They vary in heat and potency, and each has its own flavor characteristics. If you aren't familiar with purchasing curry pastes, you can typically find a brand or two at your nearest chain grocery store. However, a local ethnic foods market would be a great option, if you have one.

When purchasing your curry there are two rough guidelines you can follow. First, typically, the thicker the paste is the more concentrated the flavor will be. Next look on the package to see if it gives a recipe. If it does, look for the ratio of paste to coconut milk the brand recommends. I've tested a few different pastes in the past few months and find the brands that recommend fewer tablespoons per 14 ounces of coconut milk create the most flavorful dishes. If there isn't a ratio given, start with 1 tablespoon in this recipe and taste after the 2 1/2 hour mark. You can always add more. 

Thai food can be intimidating. I often hear people say that they would never attempt making it on their own. However, making dishes using traditional Thai flavors can be quite easy; even easier when you throw your crock pot into the mix.

Chopping a few fresh veggies and throwing everything into your pot is about the only prep for this recipe.  In just a few minutes you'll have a delicious soup simmering and filling your house with sweet Thai aromas. In the hustle and bustle of the holiday season, this soup can be great 'comfort food.'

When I first tested this recipe, I put the bell peppers into the mix and let them cook with the soup.  In my second batch I found that keeping them raw and adding them at the end with the snow peas adds a sweet crispness to the soup. My husband tells me that soup can end up tasting a little monotone after several spoonfuls; adding fresh vegetables and peanuts is a way to keep your tastebuds moving from one layer of flavor to another.

One more note: this recipe also calls for galangal - a root used as an important ingredient in Thai curry pastes. Its flavor is peppery like ginger but has a more floral and citrusy flavor. I bought powdered galangal from Penzey's Spices; however, if you can't find it or aren't interested in purchasing it, you can leave it out or add an extra teaspoon of ginger. The soup will taste great either way.  

Now curry up, Sweet Potato, and thai this soup!


Sweet Potato and Thai Curry Soup

  • 1/2 large onion, chopped
  • 1 lb of boneless chicken 
  • 1 large sweet potato, peeled and chopped
  • 8 oz can sliced water chestnuts, drained
  • 5" stalk of lemongrass, cut into 3 pieces, or 2 tsp of ground
  • 3 14 oz. cans coconut milk (full fat is better here)
  • 1 cup chicken stock
  • 2 tbsp red curry paste (I used Thai Kitchen brand)
  • 1 tsp garlic powder
  • 2 tsp galangal powder 
  • 2 tsp minced ginger
  • 1/2 - 1 tsp kosher salt
  • 2 limes
  • Red, yellow or orange bell pepper, thinly sliced
  • Snow peas, thinly sliced (about 1/2 lb will do)
  • Roasted peanuts, roughly chopped (optional)
  • Basil, minced (optional)

Combine all the ingredients from the onion through the ginger in a crock pot. I put my chicken in whole and pull it apart later (cutting raw chicken isn't one of my favorite kitchen duties, so I avoid it if I can). Stir until the red curry paste and spices are thoroughly mixed in. Turn your crock on high heat and cook, covered, for 2 1/2 hours. If you're around while it's cooking, stir it occasionally. If you aren't, that's okay!

Stir your soup and taste to see if it needs salt. I would start with 1/2 tsp and go from there, as some chicken broths have more salt than others - salt to your liking. If you started cooking with whole or large chicken pieces, remove them from your pot. Shred with a fork or cut them into bite size pieces then return it to your pot. If you aren't ready to serve, turn your heat down to warm. It'll keep like this for a couple of hours - your sweet potatoes may get softer and start breaking down, but that'll only make for a thicker soup, which is definitely not a bad thing.

When ready to serve, juice the limes into your pot and stir. Fill your bowls with soup, adding bell pepper and snow peas on top. Sprinkle with roasted peanuts and basil, if you have any. 

Serves 5


In Entree, Recipe, Fall, Soups and Stews, Winter Tags Thai, Coconut Milk, Sweet Potato, Curry
Comment

Persimmon Salad + Whipped Goat Cheese

November 23, 2015 Sarah Ward

Featured: Fuyu Persimmons
When ripe, they have a honey-like sweetness that is delicious and unique for a winter fruit.  This particular variety is not astringent (causing a chalky mouth feel) so it can be eaten when less ripe, but their sweetness deepens as they ripen.  As the persimmon ripens, the color will become richer and the flesh will start to give slightly - similar to a slightly under ripe pear.  Serve raw or cooked. 

Nutrition: Rich in potassium and Vitamins A and C. Also a good source of antioxidants, fiber and Omega-6.

Season: October through November and into December in warmer climates.

I have to confess something.  Christmas is my all-time favorite holiday.  I start looking forward the atmosphere and decorations (and the music) in something like May.  However, Thanksgiving takes a very close second.  I love seeing the incredible variety of dishes and hearing about everyone's traditional family meals.  The sides alone are enough to make someone want to gorge themselves just so they can taste everything. The only issue I find with this load of deliciousness is that most of it is heavy - cream based, bread filled, oil slathered, deep fried - and I often find myself looking for something fresh and light to help balance everything out. Thus, I bring you a nice addition to your meal of thanks.

If you're unfamiliar with the persimmon, don't shy away from this recipe.  Persimmons tend to land on fall/winter's B-list of fruits and it's time we push them out into the limelight, where they belong.  There are few varieties to choose from, but start your persimmon eating journey with the fuyu.  If you can, buy them from a local farm or a market that sources locally; they will likely be sweeter and have more flavor than what you'll find at a grocery chain. NPR's got a nice little write up about them if you want to learn more. 

Now a note about goat cheese. You may read through this and wonder 1 - why it's whipped and 2 - why it's spread on a plate under the salad. Well, if you ask two questions, you'll get two answers. 1 - whipping it changes the consistency to a delectably creamy texture that spreads easily. 2 -  spreading it under the salad allows the dressing to mix with the cheese as you're eating, and assures that you don't get overpowering amounts of goat cheese in any single bite. There's also a couple of tips on how you can adapt the recipe to use in different ways. Also, be sure to use a good goat cheese for this. Trust me, it's worth the extra few pennies. 


Persimmon Salad + Whipped Goat Cheese

  • 2 Fuyu persimmons
  • 1/2 cup pomegranate arils (seeds)
  • 1/3 cup chopped walnuts
  • 2 cups spring lettuce mix
  • 1 cup torn radicchio leaves
  • 1 orange, juiced
  • 1 tsp honey
  • 1 1/2 tbsp fresh mint, minced
  • 1 tbsp olive oil
  • Black pepper and salt to taste
  • Whipped Goat Cheese (see recipe below)

Combine the orange juice, honey and mint in a bowl and whisk together until the honey is dissolved. Slowly drizzle in the oil while whisking. Add freshly ground pepper and salt to taste (only add salt if you need to - it can help cut down on the sharpness if your orange isn't particularly sweet). 

Cut off the top of each persimmon just below the stem/leaves and slice into 1/4" thick rounds. Stack the rounds and cut them into (smallish) bite size pieces. I like to cut mine into 6 pieces. Place your persimmon pieces in a small bowl and drizzle with 1 tablespoon of dressing. Fully mix together and separate any slices that are stuck to each other - your hands are the best tool here. The dressing will help keep your slices from forming clumps. Add the pomegranate arils, lettuce, radicchio and walnuts. Pour in the remaining dressing and toss together. 

Spread 1 tablespoon of the whipped goat cheese on a salad plate. Spoon a quarter of your persimmon salad on top of the cheese and serve. 

If you aren't plating food for your guests or you're running things buffet style, try serving this salad in a radicchio leaf (like a lettuce cup, but the radicchio holds up a bit better).

To serve this way, follow the instructions up until plating. Spread 1/2 tablespoon of whipped goat cheese on the inside of each radicchio leaf. Evenly divide the salad in each leaf and serve on a platter. 

Mix it up a little and add a tablespoon of fresh minced herbs (such as rosemary and parsley) to the beaten cheese mixture. Spread on toasted baguette or serve a spoonful atop mashed potatoes.

For a sweeter take, add 2 teaspoons of cocoa powder and a tablespoon of honey (or your favorite sweetener) and beat for an additional minute.  Spread it on toast or waffles as an excellent replacement for Nutella. 

WHIPPED GOAT CHEESE

  • 2 oz plain goat cheese
  • 2 tbsp greek yogurt
  • 1 tbsp heavy cream (optional)
  • Black pepper to taste

Place all ingredients in a small bowl and whip on medium speed with a hand held electric beater for 2 minutes (a whisk will do if you don't have a hand held beater). 

The key to this element of the salad is using good goat cheese. I buy goat cheese from a local farm (Nicolau Farms) that sells at our farmers market, but you can certainly buy it from the store. I just suggest splurging a little and buying the better brand. 

 
Serves 4 if plating // Serves 5-6 if serving in radicchio leaves
 
In Recipe, Salad, Salads + Sides, Winter, Fall Tags Persimmon, Pomegranate, Walnuts, Orange
Comment
← Newer Posts Older Posts →
 

of the dirt blog

I believe there is a necessity for us to be connected to our food. It makes us aware of seasons and life cycles. It reminds us that vital functions on earth are unplugged. It gives us a unique way to express creativity and build community. I hope the recipes and thoughts shared here Inspire you to make something delicious for someone you love (or just yourself!).


BLOG AUTHOR

Sarah Ward is the Editor of Taste of the South magazine. Currently enjoying life in Birmingham, AL with her husband and their polydactyl cat, Jack.

Sarah Ward is the Editor of Taste of the South magazine. Currently enjoying life in Birmingham, AL with her husband and their polydactyl cat, Jack.


search for recipes


Follow @ofthedirt on instagram

This weekend, a group of friends and talented bakers held another bake sale. With a short 7 days of planning and 4 days of advertising, this small group of kickass women raised over $1,000 selling hand pies, cookies, and pastries. To everyone who sup
🎉GIVEAWAY!!! Want to win a free box of homemade pastries?! There are a few ways to win: 

Birmingham Locals: 
1. Tag your local friends below and spread the word about our bake sale fundraiser. Each tag is an entry. TWO winners will be chosen tomorr
HAPPY FALL!!!!!!! It&rsquo;s my favorite time of year and for the first time that I can remember, it actually feels like fall outside in Alabama! To celebrate, make a batch of these Pumpkin Oatmeal Chocolate Chunk Cookies...they use a whole jar of @t
It was 68 degrees here today and everyone was hoarding the fall products at Trader Joe&rsquo;s yesterday (I actually witnessed a woman frantically grab 6 hand soaps, 5 candles, and 3 of every pumpkin-filled-treat thing they had). BUT I&rsquo;ve got o
Quick pickles are one of the best flavor tools to keep on hand. They brighten up any dish - eggs, tacos, toast, salads, chili, sandwiches, pretty much anything that goes with vinegar. And, they&rsquo;re so easy to make! (You don&rsquo;t really even n

Let's Keep in Touch!

Get new recipes delivered right to your email. 

Thank you! Looking forward to staying in touch.

For now, head on over and say hi here. 

© Sarah Ward and of the dirt, 2017. Unauthorized use and/or duplication of the photographs and recipes without express and written permission from this blog’s author and/or owner is strictly prohibited. Excerpts and links may be used, provided that full and clear credit is given to Sarah Ward and of the dirt with appropriate and specific direction to the original content.