• Home
  • Blog
  • Basics + Pantry Staples
  • Preservation
  • Desserts & Sweets
  • Breakfast
  • Entrees & One-dish Meals
  • Salads + Sides
  • Soups & Stews
  • 10 Minute Recipes
  • About
  • Say Hello
  • Portfolio
Menu

of the dirt

Street Address
San Diego, CA
Phone Number
an exploration of food and culture

Your Custom Text Here

of the dirt

  • Home
  • Blog
  • Recipes
    • Basics + Pantry Staples
    • Preservation
    • Desserts & Sweets
    • Breakfast
    • Entrees & One-dish Meals
    • Salads + Sides
    • Soups & Stews
    • 10 Minute Recipes
  • About
  • Say Hello
  • Portfolio

Preserving Citrus Waste: Flavored Sugar and Salt

March 12, 2017 Sarah Ward

One of winter's greatest gifts is bright citrus - a welcome contrast to the darker, colder days that come with the season. The smell of an orange and tangy sweetness of grapefruit brighten the dreariest of days and brings anticipation of warmer days ahead. The downside to all of this deliciousness, though, is the amount of waste that comes from consuming citrus. Limes, lemons, oranges and grapefruits of all kinds leave behind their rinds, typically about 15% of the fruit's volume, full of flavor but too bitter to be eaten alone. This winter, I've made a point of trying to save my peels and rinds left over from juicing or eating them out of hand. I ended up with several pounds over a couple of weeks, all of which would have been wasted.

An easy dehydration in a low oven preserves these otherwise wasted rinds, allowing them to keep for months in your pantry. Dried citrus peels aren't a common pantry staple, but they are wonderful to have on hand for adding to tea, soup broths, infusing simple syrups and liquors or boiling in water on the stove, filling your house with their bright sent. My favorite use of all is grinding them to flavor salts and sugars for using in baked goods, sprinkling over eggs and toast or rimming a cocktail glass for some added flair. 


SAVING YOUR RINDS

I keep a large ziplock bag in the refrigerator to throw the rinds into after juicing a lime or peeling an orange. I also keep a smaller one for extra citrus wedges or slices. After a week or so of collection, I dehydrate the contents and store in my pantry. Please do note that if you are using store-bought citrus, it may have been coated with wax. I would suggest using a vegetable wash prior to cutting into or peeling your citrus to remove that wax. If you are using organic or un-coated citrus, just give it a good rinse with water. 

Dehydrating Rinds & Slices

If you have a dehydrator, I'm jealous and your perfectly set-up for preserving your rinds, but you certainly don't need one. An oven works really well. If stored properly in air tight containers, your dried citrus will keep for months in your pantry. If you are using citrus slices or wedges, be sure they are all close to the same thickness. I usually cute mine down to 1/8" or 1/4" thick. 

To dehydrate with an oven: Line a baking sheet with parchment paper. Spread out citrus peels and/or slices into a single layer. Place in a 170F oven (or 150 if your oven will go that low) for 5-8 hours. The peels and slices are dehydrated enough with they snap like a wafer or can be crushed in your fist.  

Flavored Sugar_063_sRGB.jpg

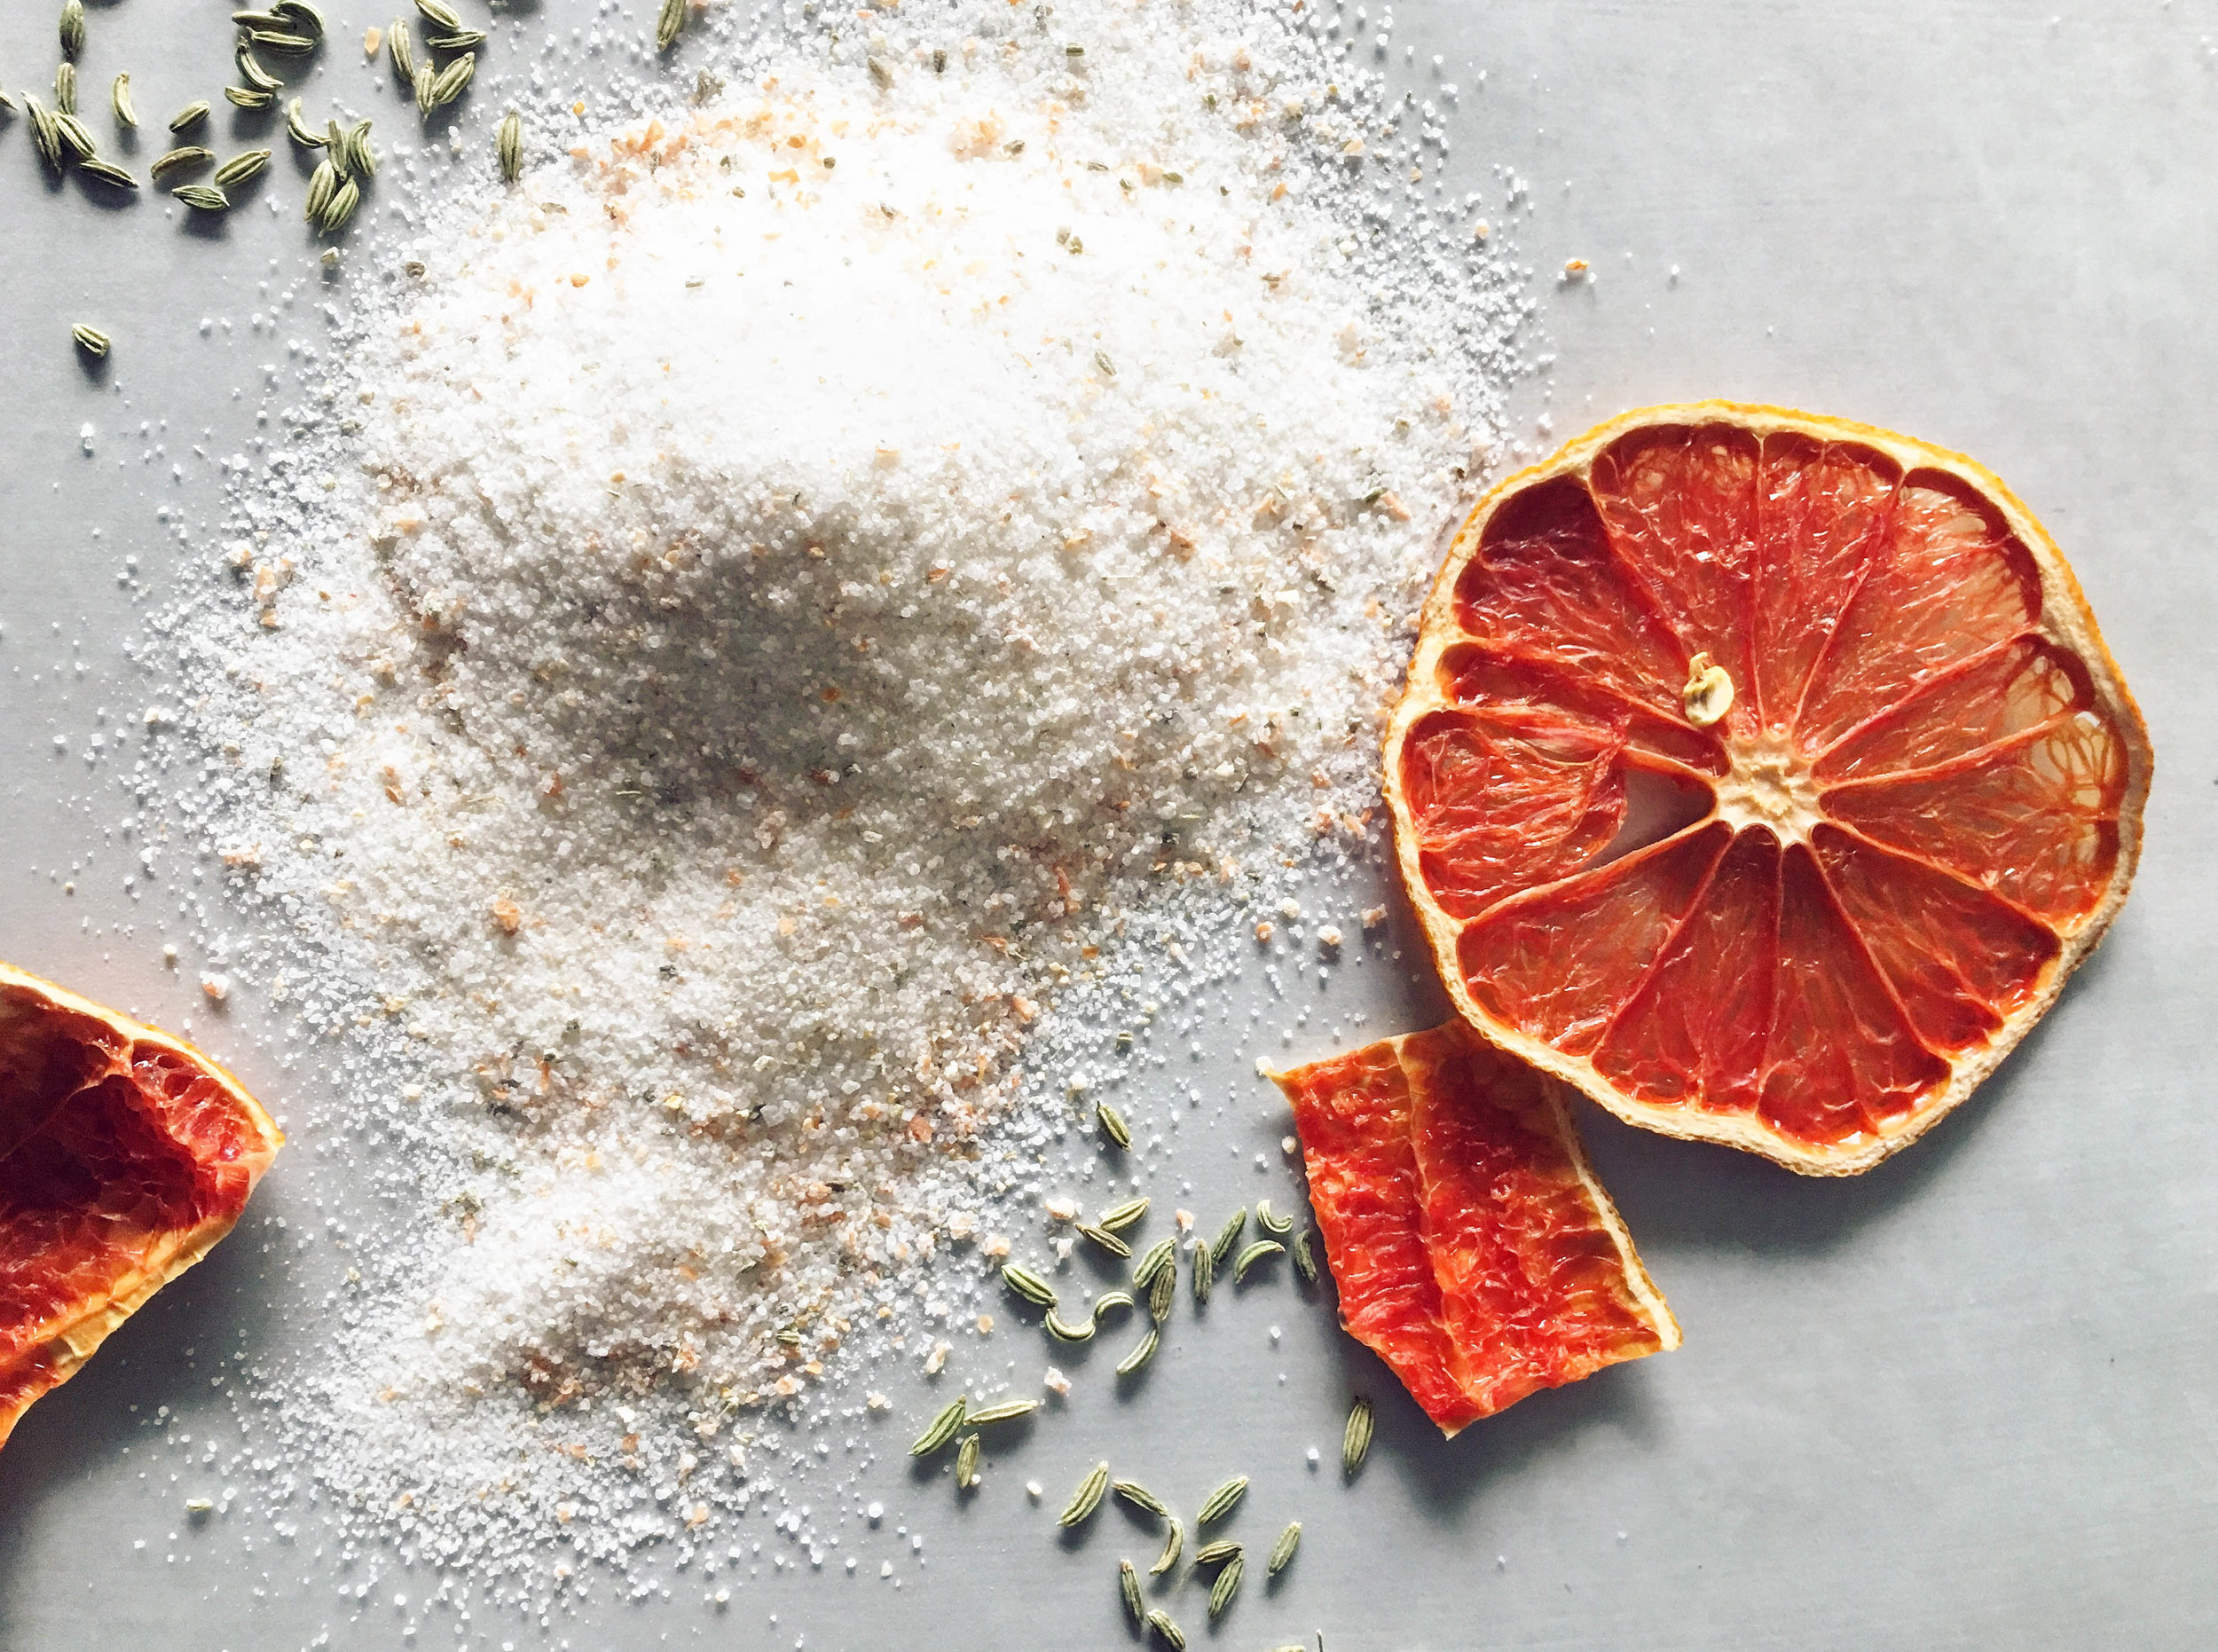
FLAVORed Sugar and Salt

Citrus + SPice Salt

  • 1/2 cup salt (kosher, Himalayan, sea salt, etc)
  • 1/4 cup dried citrus peels
  • 1 tsp spices or herbs (optional)

Line a baking sheet with wax or parchment paper. Pour the salt into the middle of the paper. Place the empty sieve on top of the salt and set aside. 

In a spice grinder or clean coffee grinder (with blades, not burs), add the citrus peels and grind until fine and powdery (some larger pieces may remain). Shake out the ground citrus into the sieve. Finely grind any spices or herbs, if needed, and add to the citrus.

Gently begin shaking the sieve over the salt until all small contents have worked their way through the mesh and only the larger pieces are left behind.  You can regrind the larger pieces and sieve again or save them for adding to a baked goods or tea. 

Carefully lift the paper and pour the salt into an airtight container (I use 8oz mason jars), seal tightly and shake to evenly distribute citrus and spices. Store in your pantry for several month. 

Pictured Below: Meyer Lemon Kosher Salt

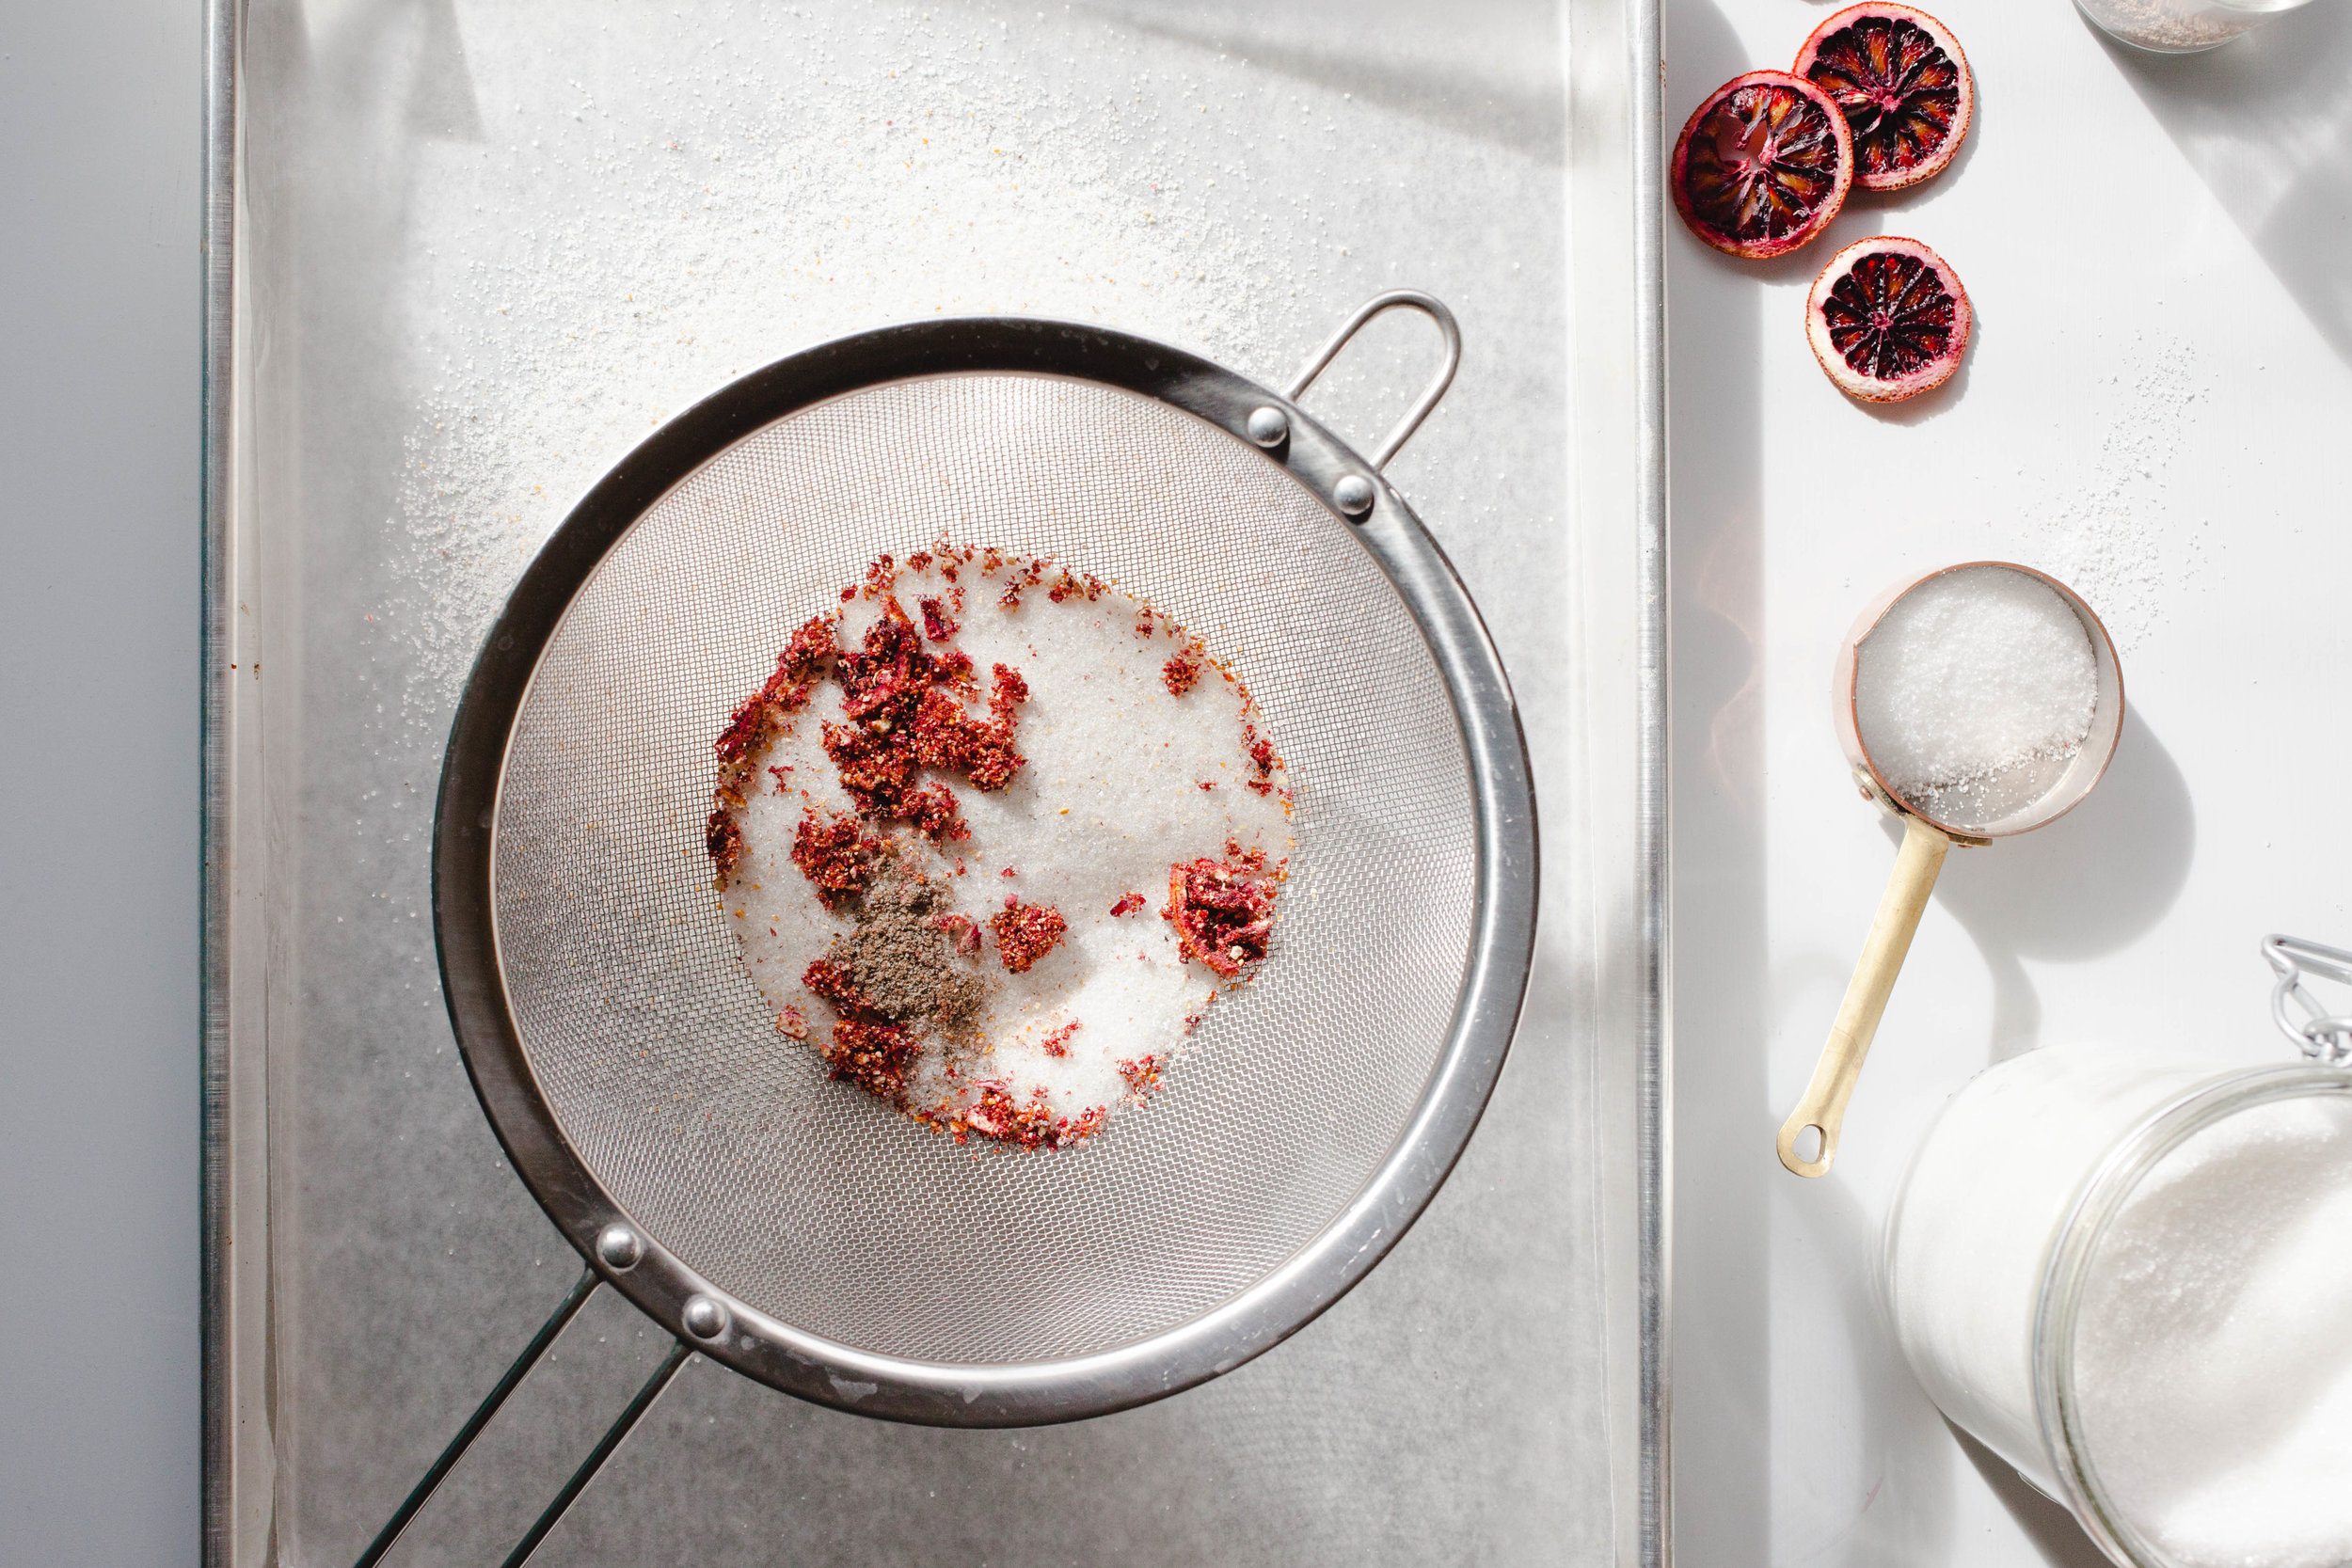
Citrus + SPice Sugar

  • 1 cup sugar (granulated or fine castor)
  • 1/2 cup dried citrus peels
  • 2 tsp spices or herbs (optional)

Line a baking sheet with wax or parchment paper. Place a fine mesh sieve on the lined sheet and add the sugar. Set aside.

In a spice grinder or clean coffee grinder (with blades, not burs), add the citrus peels and grind until fine and powdery (some larger pieces may remain). Shake out the ground citrus on top of the sugar in the sieve. Finely grind any spices or herbs, if needed, and add to the citrus and sugar.

Gently begin shaking the sieve over the paper until all small contents have worked their way through the mesh and only the larger pieces are left behind.  You can regrind the larger pieces and sieve again or save them for adding to a baked goods or tea. 

Carefully lift the paper and pour the sugar into an airtight container (I use pint sized mason jars), seal tightly and shake to evenly distribute citrus and spices. Store in your pantry for several month. 

Pictured Below: Blood Orange and Cardamom Sugar, below.

Blood Orange and Cardamom Sugar
Meyer Lemon Kosher Salt

Flavor Combination Suggestions

SALT

  • Meyer Lemon
  • Lime & Chipotle
  • Curry Powder & Ginger
  • Orange & Chili Flakes
  • Lime & Berbere
  • Black Pepper & Lemon

Sugar

  • Blood Orange & Cardamom
  • Navel Orange
  • Ginger
  • Grapefruit & Fennel
  • Lime & Ginger
  • Meyer Lemon and Lavender
In Preserved Foods, Recipe, Winter, Basics & Pantry Staples Tags Citrus, Salt, Sugar, No Waste
Comment

Roasted Brussels Sprout Leaves

February 8, 2017 Sarah Ward
Featured: Brussels Sprout Leaves
Brussels sprouts are a cruciferous vegetable, meaning they are in the Brassicaceae family which includes cabbage, broccoli, collard greens and kale and are packed with nutrition. Brussels sprouts are considered a great disease-fighting food, helping to fight against cancer, diabetes, and heart disease. 

Nutrition: Low in calories and rich in anti-oxidants, potassium, and high amounts of Vitamin K & C. They are also good sources for your daily requirements of dietary fiber, Vitamin A, manganese, potassium, folate, iron and Vitamin B6. So, basically, they're like Nature's tasty multi-vitamin. 

Season: Harvest season is between September and March in temperate climates. Sprouts and leaves become sweeter after a frost.

Brussels sprouts in all forms are covering restaurant menus and Pinterest pages these days, but often overlooked are the large leaves that shelter the tiny sprouts as they grow (if you're unfamiliar with how Brussels sprouts grow, check this out). The leaves are edible and just as tasty as the sprouts. They aren't typically found in conventional grocery stores, but they are popping up around farmers markets or you may have them in your own garden. The leaves can be used in the same ways as kale, cabbage or collard greens by sautéing, shredding into salads or adding to green smoothies. But what you may be even less familiar with or just walked by dismissing it as cabbage, is the top of the Brussels sprouts stalk. As the stalk grows, the leaves form a head at the top, much like a very loose head of cabbage or one giant Brussels sprout. I love the small sprouts, but I definitely think the head of leaves is where the magic is. 

To me, the best roasted sprouts are when the outer leaves get crispy but the inner core is tender and sweet. The head of Brussels sprout leaves create that partnership perfectly.  If you are growing your own Brussels sprouts or find the heads locally, try this method of roasting and treating it like one giant Brussels sprout. The recipe below is just a baseline for roasting; how you choose the finish the roasted leaves us totally up to you! I used a bunch of fresh herbs I had leftover in the fridge to make a pesto, drizzled with extra vinegar, some shaved parmesan and additional fresh herbs. This is a great way to use up leftover condiments, herbs, sauces and cheeses that you have sitting around. If you can't find the heads of leaves, a napa, savoy or red cabbage will substitute nicely. 


Roasted Brussels Sprout Leaves

  • 1 head of Brussels sprout leaves or cabbage
  • 1/2 cup balsamic vinegar
  • 2 tsp brown sugar, honey or maple syrup
  • 1/2 tsp kosher salt
  • 2 Tbsp olive oil
  • Various toppings of choice (pesto, chili oil, Sriracha, fresh herbs, cheese, etc.)

Preheat your oven to 375 F. 

Cut your head of Brussels sprout leaves or cabbage in half, from the top of the head to the stem end. Place each half cut side up on a lined baking sheet. 

In a small bowl, mix together vinegar, sugar, salt and olive oil. Pour a quarter or so of the mixture over the cut side of each half, allowing the liquid to seep in between the layers of leaves. Flip them over, cut-side down and lift any outer loose leaves, brushing the inner leaves with the mixture and all over the outside of each half. If you have any remaining vinegar, set aside for later use. 

Place the sheet pan in the oven and roast for 20-30 minutes, or until the middle is tender and the outer leaves become brown and crispy. You do not want them to burn.

Remove from the oven and serve with garnishes of your choice.  I drizzled mine with the remaining vinegar, herb pesto, fresh mint and dill leaves, and shaved parmesan cheese. 

In Recipe, Salads + Sides, Winter, Vegetarian, Vegan, Fall Tags Brussels Sprouts, roasted vegetables, vegan, vegetarian
Comment

Persimmon and Apple Crumb Pie

December 22, 2016 Sarah Ward

One of the most anticipated fruit seasons of the year for me is when persimmons hit the market. I find myself with a bowl full of them on the counter at most times during the months of fall and winter. These orange squatty fruits are like little the peaches of winter - nothing quite like them and when they are ripe and sweet they are perfect eaten out of hand. I will issue you a fair warning though; please be sure you know which variety your are digging into and just what "ripe" means for it, or you might surprise yourself with a less-than-thrilling feeling of eating chalk....

I know I talked a bit about persimmons last year, but I keep meeting people that don't know what they are or don't like them because they've had a bad experience eating an astringent one. So, I'll be posting a few persimmon based recipes as we lead into winter. For those of you who don't fawn over pumpkin everything, persimmons may just be the "basic" obsession you need.    

Featured: Fuyu Persimmons
When ripe, they have a honey-like sweetness that is delicious and unique for a winter fruit. This particular variety is not astringent (causing a chalky mouth feel) so it can be eaten when less ripe, but their sweetness deepens as they ripen. As the persimmon ripens, the color will become richer and the flesh will start to give slightly - similar to a slightly under ripe pear. Serve raw or cooked.

Nutrition: Rich in potassium and Vitamins A and C. Also a good source of antioxidants, fiber and Omega-6.

Season: October & November; through winter in warmer climates.

For this Persimmon and Apple Crumb Pie, you'll want to find richly colored Fuyu persimmons that are still firm. You can tell if they are the right ripeness by placing one in your palm and gently giving it a squeeze - it should feel like an apple. If this is your first time working with persimmons, keep the stem end on while peeling and slicing. This will give you something to grip and ensure your hand doesn't slip (while I'm sure the ER doctors are lovely, please don't go visit them). You can use a standard vegetable peeler and peel the fruits just like you would an apple. There is no thickening agent added to this pie, something which any pie maker might find odd. Persimmons are very high in pectin and since the fruit macerates and the juiced are then reduced, there's no need for extra cornstarch or flour. 


Persimmon and Apple Crumb Pie

  • 6 Fuyu persimmons (4-5 if they are large - about the size of your palm)

  • 1 large apple, cored

  • 3 Tbsp granulated sugar

  • 3 Tbsp brown sugar (or sub in 6 Tbsp coconut sugar for both granulated and brown cane sugar)

  • 1 tsp ground cinnamon

  • 1 tsp ground ginger

  • 1/4 tsp ground cardamom

  • 1/8 tsp ground black pepper

  • 1 large orange, juiced

  • 1 recipe Basic Pie Crust, prepared and refrigerated

  • Egg wash (optional; 1 egg beaten with 1 Tbsp cold water)

Crumb Topping

  • ½ cup all-purpose flour

  • ½ cup almond flour

  • 3 Tbsp brown sugar

  • 4 Tbsp unsalted butter

  • ½ vanilla bean, split and scraped or 1 tbsp vanilla extract

Peel and slice the persimmons and apples into thin rounds (1/4” thick). If you have a mandolin, keep the stem end on the fruits to use as a hand guard and guide. Deseed any slices if necessary and place in a gallon size zip-top bag or other airtight container. In a small bowl, combine both sugars and all dry spices. Sprinkle over the fruit. Pour in the orange juice and toss to fully coat. Seal the bag, making sure to press out any air, or press a sheet of plastic wrap onto the surface of the fruit and seal with the lid. Place in the refrigerator for at least 6 hours or overnight.

Roll out the pie dough and place it in a 9” pie pan. Crimp or decorate the edges as desired. Place the prepared crust in the freezer until ready to fill.

(This is a great place to pause if you need to prepare something else for your meal or are wanting to prep for your pie ahead of time. When ready to bake, continue with instructions below.)

Preheat oven to 350 F.

Strain the sliced fruit, collecting the syrup in a bowl. Place the syrup in a small sauce pan over medium-low heat and bring to a low simmer, stirring occasionally. Cook until the liquid thickens and becomes the consistency of cold maple syrup. Remove from the heat and set aside.

To make the crumb topping, mix together flours and sugar. Add the butter to a small saucepan over medium-low heat. Stir as the butter melts and bubbles. Continue stirring and cook until the butter solids start to brown, about 3 minutes. Remove from the heat and stir in the vanilla bean scrapings or extract. Pour the browned butter over the flour mixture, mixing with a fork until the ingredients are no longer dry and have formed small clumps.

Remove your pie crust from the freezer and brush the edges of the crust with the egg wash, if desired. Fill the pie by evenly layering in the sliced fruit. Some of the persimmon slices may have stuck together, so gently peel them apart. For any groupings that are falling apart instead of pealing away from each other, don't worry about separating them. Pour the reduced syrup over the fruit and spread the crumb topping evenly over the pie. Place on a parchment lined  sheet pan in the middle of your oven for 35-40 minutes.  The pie is done when the juices begin to bubble up along the edges of the filling.  

Cool on a rack for at least 1 hour before serving. This pie is excellent served with a scoop of vanilla bean ice cream or freshly whipped cream.

Yield: 9" pie - about 8 servings // Store in the refrigerator loosely wrapped in plastic for up to a week.

IMG_3113.JPG


In Dessert, Holiday Recipes, Pie, Winter, Recipe, Fall Tags Persimmon, pie, Holiday Pie, Apple, Apple persimmon pie, apple pie, persimmon pie, fuyu persimmons, fuyu persimmon pie, persimmon desserts
Comment

Roasted Carrots with Chopped Mint Dressing

November 30, 2016 Sarah Ward
Roasted-Carrots-with-Mint-Dressing_007_sRGB.jpg

Carrots have been filling the farmers markets around here as of late. Commercially, we are often used to buying carrots in their perfectly cut "baby carrot" form - clean, bagged and ready for snacking.  There is certainly nothing wrong with some convenience, but I can tell you, it's worth the bit of extra time it takes to clean these roots when purchased locally. They are often much sweeter and typically cheaper per volume to buy direct from the farmer. Depending on which region of the country you live, you should see carrots in your farmers market through the start of winter, if not longer. 

Roasting is one of the best ways to bring out and intensify this root’s inner sweetness. Seasoned with a hint of heat that balances nicely with fresh mint dressing, these Roasted Carrots with Chopped Mint Dressing are a tasty, versatile side dish. If you happen to have any leftovers, try chopping up the cold carrots and adding them to a salad.

Find this easy Bonnie Plants recipe here.

In Winter, Fall, Vegetarian, Vegan, Sides, Salads + Sides Tags carrots, mint, roasted vegetables
Comment

Heirloom Apple Pie (create your own family recipe)

November 20, 2016 Sarah Ward
Heirloom Apple Pie_031_sRGB.jpg

To many families, holiday traditions just aren't complete until Grandma's (or Aunt Martha's, or Uncle Pete's) pie has been passed around the table. Like an heirloom, these revered recipes often come to us from generations past and connect us to the larger whole of our family. I grew up with two Southern grandmothers (well, one was technically Cuban but adopted by the south), so my family is certainly not short on heirloom recipes. However, a good holiday pie is conspicuously absent, so this season I set out to create one. I came up with a few tips during this process that I'd like to share so that you can start your own holiday tradition.

How to test your pie flavors 

Ok, I know that the hardest part about putting a pie recipe together can be knowing where to start. It can be so frustrating to put in the work peeling all of those apples and rolling out crust only to end up with flavors that just don't dazzle. My suggestion here is to start with some small-scale tests. Cooking apples with a few different spice mixes on the stovetop is quick and an easy way to experiment without having to commit to a whole pie (side note: this technique is also great for a stand alone dessert on those nights when you wanna be easy but still treat yo'self). I've broken this process down to a few simple steps and put them into a guide to help you organize the process.

  • Download the recipe testing chart (via the button below)

  • Choose a variety of apples to test with - both tart and sweet, soft and firm

  • Get creative with your spices and flavors - this is the perfect time to try things that you might be unsure of how they'll taste. There's a sheet included in the download with a guide to apples and complimenting flavors. Google is a great resource here, as well. Simply search for "Spices (or fruits, nuts, flavors...) that compliment _____" and go from there. `

  • Once you've determined what spices and flavors are your favorite, scale the recipe as denoted on the sheet. The basic formula is below:

    • Measurement of spices/other flavorings used in test x # of apples used in a full pie = Total measurement for a full pie

  • Follow the recipe below for making your full heirloom pie!

Note about scaling: Small scale tests may not always translate perfectly to the full-size version. I recommend trying to use the same size apples in your pie that you tested. Or, given that apples naturally vary in size, premix your spices to your full scale and add them into your apples a teaspoon at a time - this is mostly important for your first full-scale pie. If you track your teaspoon measurements, you can make up a big batch of heirloom pie spices and just list your recipe as "3 tsp of family spice mix." This would be a great thing to keep on hand or give a jar along with the pie recipe to your family as a personalized gift (and win best gift giver of the year).

Recipe Testing Chart (click to download)

Share your family's creation with #heirloomapplepie and #ofthedirtrecipes!


heirloom Apple Pie

  • 5-7 apples (a variety of tart and sweet)

  • 1 tablespoon sugar per apple (half brown, half granulated is recommended, or try coconut sugar)

  • Heirloom Test Recipe spice mixture (or 3-4 tsp spices of choice)

  • 1 tablespoon all-purpose flour or tapioca flour per apple

  • 2 Basic Pie Crusts

  • Egg wash (1 egg beaten with 1 Tbsp water; optional)

  • Sugar for finishing (optional)

  1. Peel, core and slice your apples into ⅛ - ¼” thick slices. Cut into bite-sized pieces or leave whole and place in a large mixing bowl. Add in sugar and spices and toss to coat. If you are using your tested heirloom spices for the first time, it is recommended to add the mix in one teaspoon at a time. Taste an apple slice as you go and stop when you feel it is seasoned to your liking. Cover and let stand for 3 hours or chill overnight. (You can skip this step, but letting the apples macerate will help reduce the amount the fruit shrinks when baking.) Stir flour into apples.

  2. Roll out one disk of pie dough and fill your 9” pie pan. Trim or leave the overhang depending on how you’d like to decorate the crust. Fill your crust with apples, gently pressing them down as you go - this will help them settle and keep your pie from developing a gap between the apples and top crust. Dome apples in the center if they rise above the pan’s edge.

  3. Roll out the second pie dough and cover the top of the apples in any design desired. If covering with a full crust and not a lattice or cut shapes, be sure to cut a few slits in the top for ventilation. Trim edges of dough to about 1-inch beyond the edge of the pan. Fold edges over and crimp as desired. Brush with the egg wash and sprinkle with sugar, if desired. Freeze pie while oven preheats.

  4. Preheat oven to 415F

  5. Place the pie on a lined baking sheet. Bake in the center of your oven for 15 minutes. Reduce the heat to 350F and bake for an additional 45 - 50 minutes. Cool on a rack for a minimum of 30 minutes before serving.

Apple varieties I used in my final pie.

Apple varieties I used in my final pie.

Filling Apple Pie.gif
In Dessert, Fall, Pie, Recipe, Winter, Holiday Recipes Tags pie, Dessert, Apple, Heirloom Recipe, Thanksgiving, Christmas, Holiday Pie
1 Comment
← Newer Posts Older Posts →
 

of the dirt blog

I believe there is a necessity for us to be connected to our food. It makes us aware of seasons and life cycles. It reminds us that vital functions on earth are unplugged. It gives us a unique way to express creativity and build community. I hope the recipes and thoughts shared here Inspire you to make something delicious for someone you love (or just yourself!).


BLOG AUTHOR

Sarah Ward is the Editor of Taste of the South magazine. Currently enjoying life in Birmingham, AL with her husband and their polydactyl cat, Jack.

Sarah Ward is the Editor of Taste of the South magazine. Currently enjoying life in Birmingham, AL with her husband and their polydactyl cat, Jack.


search for recipes


Follow @ofthedirt on instagram

This weekend, a group of friends and talented bakers held another bake sale. With a short 7 days of planning and 4 days of advertising, this small group of kickass women raised over $1,000 selling hand pies, cookies, and pastries. To everyone who sup
🎉GIVEAWAY!!! Want to win a free box of homemade pastries?! There are a few ways to win: 

Birmingham Locals: 
1. Tag your local friends below and spread the word about our bake sale fundraiser. Each tag is an entry. TWO winners will be chosen tomorr
HAPPY FALL!!!!!!! It’s my favorite time of year and for the first time that I can remember, it actually feels like fall outside in Alabama! To celebrate, make a batch of these Pumpkin Oatmeal Chocolate Chunk Cookies...they use a whole jar of @t
It was 68 degrees here today and everyone was hoarding the fall products at Trader Joe’s yesterday (I actually witnessed a woman frantically grab 6 hand soaps, 5 candles, and 3 of every pumpkin-filled-treat thing they had). BUT I’ve got o
Quick pickles are one of the best flavor tools to keep on hand. They brighten up any dish - eggs, tacos, toast, salads, chili, sandwiches, pretty much anything that goes with vinegar. And, they’re so easy to make! (You don’t really even n

Let's Keep in Touch!

Get new recipes delivered right to your email. 

Thank you! Looking forward to staying in touch.

For now, head on over and say hi here. 

© Sarah Ward and of the dirt, 2017. Unauthorized use and/or duplication of the photographs and recipes without express and written permission from this blog’s author and/or owner is strictly prohibited. Excerpts and links may be used, provided that full and clear credit is given to Sarah Ward and of the dirt with appropriate and specific direction to the original content.