What's better than butter? BETTER BUTTER. You may be asking yourself, ‘how do you possibly improve the creamy deliciousness of butter?’ Make it at home! Homemade butter seems like a thing of the past; the stuff of bedtime stories your great-grandmother told you about growing up on ‘the farm.’ It's become such a staple of our corner-store and super-market dairy cases that recipes are written using the ubiquitous measurement of "sticks" - those perfect little rectangles of solid dairy gold.
Making butter at home isn’t just a quick way to get the smug sense of culinary self satisfaction, it’s incredibly easy. It takes about 10 minutes (really...) from start to finish, and it’s easy to freeze so you always have butter on hand. And as if that weren’t enough, it also gives you the opportunity to add flavors right from the start (lavender-honey butter, anyone?). So, save your tastebuds and skip the extra packaging by making your own butter. I'll explain the technique below, and a few findings I discovered along the way.
Homemade Butter
- Heavy whipping cream
- Salt (optional - 1/4 tsp per 1 pint cream)
Pour the heaving whipping cream into the bowl of a stand mixer or a medium size mixing bowl, if using a hand mixer. Beat at medium speed (#4-5 setting on a KitchenAid stand mixer) until the desired consistency is reached.
ADDING HERBS AND SPICES
To flavor whipped butter: Add most herbs or spices with the salt. If adding something delicate like roasted strawberries (because, YUM), wait to add until desired consistency of butter has been met, then gently mix in and store.
To flavor solid butter: Add most herbs or spices with the salt. If you want to keep the buttermilk plain for another use, wait to mix in flavorings until you've strained the solid butter from the liquid. Gently mix in with a fork or spatula and store.
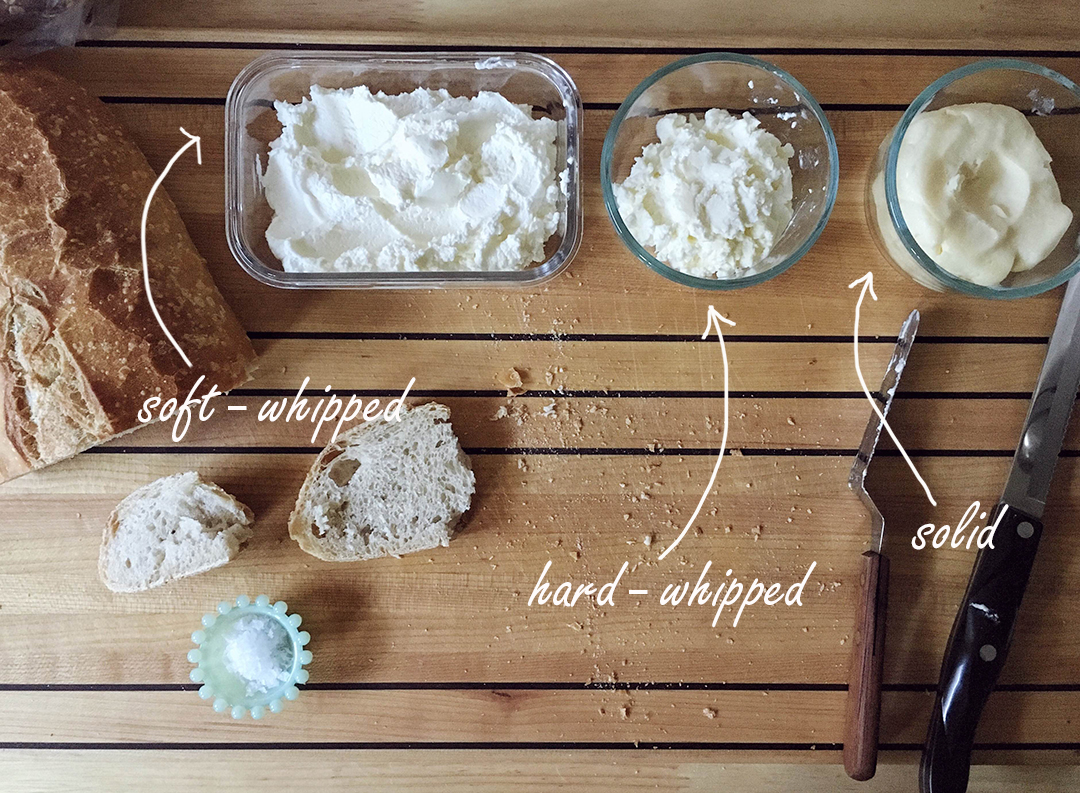
Below are three different stages - soft-whipped, hard-whipped and solid butter. In the first two, the whey doesn't separate, so the flavor is sweeter than your typical hard butter. It will also spoil sooner, so be sure to use it quickly (which, trust me, won't be a problem). Also, at any stage, you can remove a portion of the butter. So, for instance, say you want some whipped butter and some hard butter but not a pint's worth of either. Remove any amount of butter at the first or second stage and then continue whipping until you've reached solid butter.
Soft-Whipped
Whip time = about 9 min*
- Basically like a very stiff whipped cream (similar to what restaurants serve on the side with pancakes)
- Sweet and fluffy
- Ideal for spreading cold or at room temperature without tearing up your muffins or banana bread
Add salt at the 8 minute mark and continue mixing. Store in an airtight container for 1 - 2 weeks.
Suggest Flavors: Orange Zest, Roasted Strawberries, Vanilla Bean
Freezing: Surprisingly, the texture only changes slightly. Because the butter still contains both solids and liquids, the texture gets just a little grainy, but remains creamy and fluffy. Freeze in an airtight, freezer proof container. For best quality, use within 3 months.
Hard-Whipped
Whip time = about 9 1/2 min*
- Still soft, the fat is beginning to separate giving it a slightly firmer more 'buttery-slick' mouth-feel
- Easy to spread at room temperature but harder than 'Soft-Whipped' when cold - perfect for crusty breads
Add salt at the 8 minute mark and continue mixing. Store in an airtight container for 1 - 2 weeks.
Suggested Flavors: Lavender-Honey, Cinnamon, Garlic Powder
Freezing: Same observation here as with the 'Soft-Whipped'. Freeze in an airtight, freezer proof container. For best quality, use within 3 months.
Solid Butter
Whip time = about 10 min*
- Fat and liquid totally separated
- Hard but spreadable at room temperature
- Hard and not spreadable when cold - same consistency as store-bought sticks
Around the 9 minute mark, scrape down the sides, add salt and continue mixing until the butter is fully separated from the liquid (whey) - congratulations, you just made buttermilk, too! Strain through a fine mesh sieve or cheesecloth. Squeeze the pieces of butter together, forming one mass and helping to remove any excess buttermilk. Place in an airtight container and refrigerate up to 3 weeks.
Use the salted buttermilk to add a mild creamy flavor to soup stock or sauces. Or leave the salt out to use the buttermilk for coffee or baked goods, and use the butter in your pie crusts! You can always add salt to hard butter by gently folding it in with your fingers.
Suggested Flavors: Honey-Herb, Fresh Dill, Black Pepper and Garlic
Freezing: Freezes excellently. Wrap well in parchment paper and put in a freezer safe container or bag. For best quality, use within 3 months.
*Please note the whipping times are approximate and may vary depending on your machine. Use them as a guide but determine your finished product by sight and personal taste.