• Home
  • Blog
  • Basics + Pantry Staples
  • Preservation
  • Desserts & Sweets
  • Breakfast
  • Entrees & One-dish Meals
  • Salads + Sides
  • Soups & Stews
  • 10 Minute Recipes
  • About
  • Say Hello
  • Portfolio
Menu

of the dirt

Street Address
San Diego, CA
Phone Number
an exploration of food and culture

Your Custom Text Here

of the dirt

  • Home
  • Blog
  • Recipes
    • Basics + Pantry Staples
    • Preservation
    • Desserts & Sweets
    • Breakfast
    • Entrees & One-dish Meals
    • Salads + Sides
    • Soups & Stews
    • 10 Minute Recipes
  • About
  • Say Hello
  • Portfolio

Chocolate Chip Cookies - Your Way!

May 5, 2020 Sarah Ward
Chocolate Chip Cookies_Vegan_017.jpg

For Christmas 2018, I developed a Cranberry-Orange Chocolate Chunk Cookie. It used browned butter, fresh cranberries, orange zest, and spices to flavor the dough. Since then, I’ve been adapting that recipe based on my mood and the dietary needs of my friends and family. They’ve been a hit in all forms, so I thought it was time to introduce to you this easily adaptable recipe for making Chocolate Chip Cookies Your Way! With one recipe, you can make regular, vegan, gluten-free, or gluten-free-vegan cookies.

For the vegan version, I tested with coconut oil, vegan butter sticks, and soft vegan butter spread. I found the two butter alternatives worked great. Coconut oil did the job, but they were very oily. If you do want to go that route, I suggest reducing the oil to 3/4 cup, melted as it has a higher fat content than the butter alternatives. For the gluten-free version, I chose almond flour. It’s not going to give you a really chewy cookie, but it has the best crumbly texture and it’s pretty soft/chewy-like when warm. Plus, you get the added benefit of a little protein! Can’t complain about one health benefit to a cookie, can we….

An important note about this dough: It’s easy to make but it’s important to be patient. The dough requires a rest time of at least 30 minutes before shaping and baking, no matter what version you’re making. I know, it’s hard to wait for fresh baked cookies, but trust me, let the dough take a cat nap. This rest time allows the flavor to develop and it hydrates the flour, creating a better-textured cookie.

Oh, did I mention this recipe makes huge cookies that are chewy on the inside (but not doughy) and crispy/caramelized on the edges? You could call it perfect, but we won’t start that debate right now….you’ve got cookies to bake! The dough also freezes great and can be baked straight from the freezer. So, make a big batch, scoop it, and freeze the dough balls. Want to make smaller cookies? Those instructions are included, too. Happy baking!


CHOCOLATE CHIP COOKIES YOUR WAY

Makes: about 15 (5-inch) cookies // about 32 (2.5-inch) cookies

ingredients

  • 1 cup unsalted butter, browned
    or 1 cup vegan butter*, melted

  • 3/4 cup packed light brown sugar

  • 3/4 cup granulated white sugar

  • 1 large egg (omit for vegan)

  • 2 teaspoons vanilla extract

  • 2 cups all-purpose flour

    or 2 1/2 cups almond meal

  • 1 teaspoon baking soda

  • 1 teaspoon kosher salt

  • 1 1/2 cups dark chocolate chunks

  • 1 1/2 cups other mix-ins, optional (chopped dried or candied fruit, nuts, toasted coconut, etc.)

  • Flaked salt, optional


    *I used Earth Balance Buttery Sticks

method

  1. In a mixing bowl, whisk together flour, baking soda, and salt.

  2. In a large mixing bowl, beat melted or browned butter and sugars at medium speed for 2 minutes. Add egg and vanilla, beating for another minute. With mixer on low, gradually add flour until fully combined. Stop to scrape sides and bottom of bowl. Fold in chocolate and other mix-ins, if using. Cover with a kitchen towel or plastic wrap, and let dough rest at room temperature for 30 minutes.

  3. Preheat oven to 350º. Line a rimmed baking sheet with parchment paper.

  4. For large cookies: Using a 1/4 cup ice cream scoop, scoop cookie dough into balls. Arrange dough balls on lined baking sheet 4 inches apart. (Bake in batches.)

    Bake for 14 to 15 minutes.

    For small cookies: Using a 1.5 tablespoon spring loaded scoop, scoop cookie dough into balls. Arrange dough balls on lined baking sheet 2 inches apart. (Bake in batches.)

    Bake for 9 to 10 minutes.

  5. Let cool on pan for 5 minutes. Sprinkled with flaked salt, if desired. Remove and finish cooling on a wire rack.

Vegan Chocolate Chip Cookies

Chocolate Chip Cookies_Vegan_002.jpg
Chocolate+Chip+Cookies_Vegan_010_sRGB.jpg

Gluten-Free Chocolate Chip Cookies

Chocolate Chip Cookies_Gluten Free _003_sRGB.jpg
Chocolate Chip Cookies_Gluten Free _011_sRGB-3.jpg

IMG_8666.jpg

Freeze the dough

Freezing cookie dough is a great way to prep for busy baking seasons or to always have cookies on hand - because that’s obviously the best reason.

Scoop dough onto a wax paper lined pan. Freeze for several hours or overnight. Frozen dough can then be transferred to freezer bags. (This works for both cookie sizes.)

When ready to bake, preheat oven and bake as directed, adding 2 to 3 minutes to the baking time.

Chocolate+Chip+Cookies_Vegan_005_sRGB.jpg
Chocolate%2BChip%2BCookies_Gluten%2BFree%2B_009_sRGB.jpg
In Dessert, Recipe, Vegan, Gluten-Free Tags Cookies, Vegan, Gluten-Free
Comment

Chocolate-Blood Orange Marble Bread

February 15, 2020 Sarah Ward
_MG_8123_sRGB.jpg
IMG_4252.jpg

I eagerly wait in anticipation for blood orange season. I know there are plenty of delicious orange varieties out there months earlier than when blood oranges hit the market (and I eat plenty of those), but there’s something special about cutting open the bright orange rind and discovering what shade of magenta- to wine-colored flesh lies inside. They are fairly easy to find at grocery stores these days, but if you can’t find them in your area or your looking for a good, small-farm provider, you can buy them from my friends at Good Taste Farm! Farmers Kris and Sarah have some of the best citrus I’ve eaten and they’ll happily ship directly to your house or office. Plus, you can sign up for monthly subscription boxes so you’ll get a tasty surprise box each month filled with goodies like limes, passion fruit, and today’s subject - blood oranges.

When I’m in need of something delicious but don’t have a lot of time and/or energy, I turn to quick breads. With a simple stir-together batter, this marbled style looks complicated, but it’s actually really easy. You make one batter, scoop some out, and add cocoa to one portion. No fuss, just a beautiful and tasty end result. The bright pink glaze gets its color from that magenta blood orange juice - thank you nature! You can get more creative with this recipe by adding in some spices like ginger or cardamom, adding a touch of almond extract, or stirring in some chocolate chips. Have fun with it, and happy baking!

Order Blood Oranges!

Chocolate & Blood orange marble bread

Makes 1 (8x4-inch) loaf or 6 servings

ingredients


Bread

  • 1½ cups all-purpose flour

  • ½ cup plus 2 tablespoon white sugar

  • 1 teaspoon baking soda

  • ½ teaspoon baking powder

  • ¼ teaspoon kosher salt

  • ½ cup whole milk, room temperature
    and divided

  • ½ cup salted butter, melted

  • ¼ cup blood orange juice

  • 2 large eggs

  • Zest of 1 blood orange

  • 1 teaspoon vanilla bean paste or extract

  • ½ teaspoon almond extract

  • 3 tablespoons cocoa powder

Glaze

  • 1 cup powdered sugar

  • 2 tablespoons blood orange juice

METHOD

  1. Preheat oven to 325°. Spray an 8x4-inch loaf pan with baking spray. Line sides and bottom with parchment paper letting the excess stick up over the edges.

  2. BREAD: In a large bowl, whisk together flour, sugar, baking soda, baking powder, and salt. In a separate bowl, whisk together ¼ cup milk, melted butter, ¼ cup blood orange juice, eggs, zest, vanilla paste, and almond extract. Stir butter mixture into flour mixture until combined. Reserve 1 cup batter in a small bowl; stir cocoa powder and remaining ¼ cup milk into reserved batter.

  3. Add half of plain batter to prepared pan, smoothing with an offset spatula. Pour chocolate batter over plain, mostly cover it it. Top with remaining plain batter. Gently swirl batters together using a knife.

  4. Bake for 55 to 57 minutes or until a wooden pick inserted in the center comes out with a few moist crumbs. Let cool completely in pan.

  5. GLAZE: In a small bowl whisk together powdered sugar and 2 tablespoons blood orange juice until smooth. Add additional tablespoons if a thinner consistency is desired. Top cooled loaf with glaze and blood orange slices, if desired. Bread will keep, covered, at room temperature for 2 days.


_MG_8102_sRGB.jpg
In Dessert, Recipe, Winter Tags Cake, Orange, chocolate
Comment

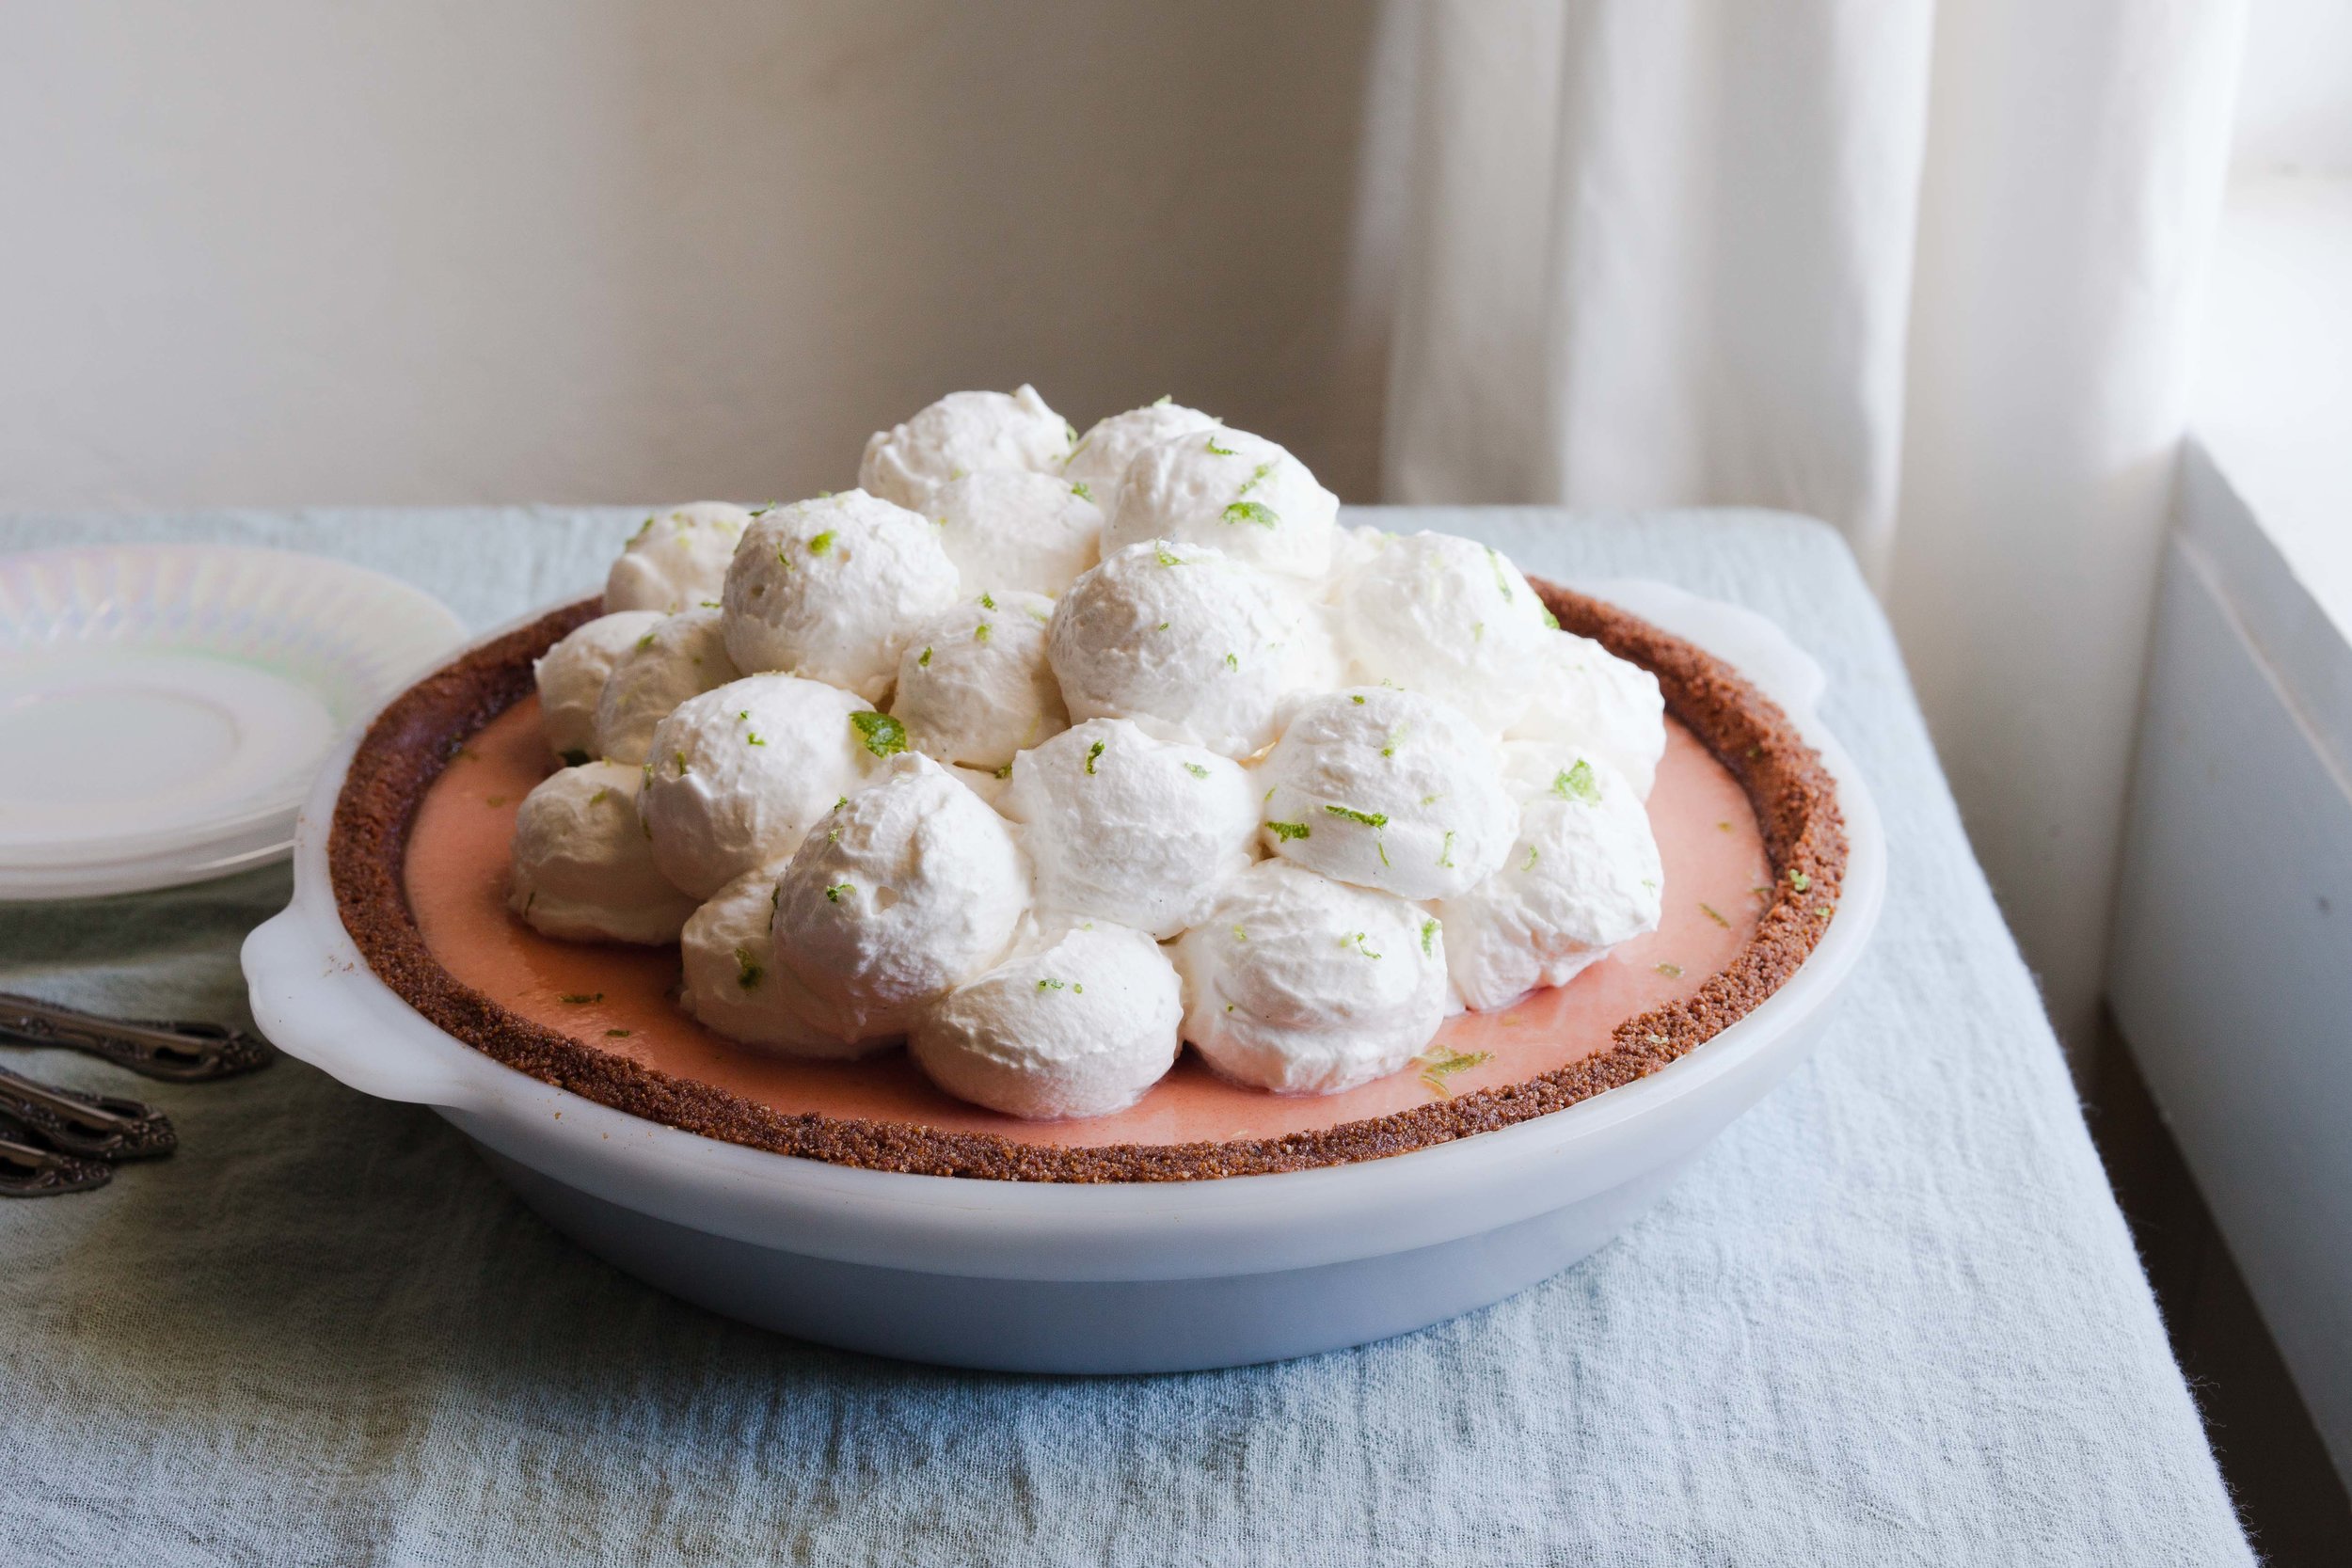
Watermelon Key Lime Pie

September 2, 2019 Sarah Ward
Watermelon Key Lime Pie_009_sRGB.jpg

Spring Loaded Scoop

For a pretty way to style the whipped cream that’s also hassle free, use a small spring loaded scoop to create little balls of cream. It’s super easy to execute and doesn’t require any special tools like a piping bag. Just plop the little spheres of cream straight onto the pie and start piling them up in the center.

I have very vivid childhood memories of eating watermelon. Running up and down the street at our neighborhood block party with a huge slice. Sneaking ice cold slivers out of the fridge between meals. Sitting at the pool with my cousin and grandmother, pulling the Tupperware container out of the cooler and waiting impatiently while the adults got a 15 minute “courtesy swim.” Spitting the seeds as hard as I could at my brothers after they told me swallowing them would cause a watermelon to grow in my stomach (and then spending weeks wondering if they knew something I didn’t…yeah, I trusted them way too much.)

Moving back to my hometown has sparked a craving for nostalgic eats, and when I set out to make a pie celebrating this iconic fruit of my summers in Alabama, I also remembered how mysterious Key Lime Pie was to me as a kid. It was something my mom talked about from her years growing up in Florida but never ate outside the state because it wasn’t “the real stuff.“ The first memory I have of eating this elusive-to-me dessert was in my teens on a trip my mom and I took to Miami. I don’t remember if it fell into the authentic category or not, but I do remember thinking “this is delicious; why don’t we eat this more often?” I realize adding watermelon to the pie is definitely taking it a few step further from classic side of things, but it’s an ode to my childhood summers - and it’s also a down right delicious combination.

While there’s debate on whether Key Lime Pie originated in Florida or New York, there is no debate on watermelon and lime being complimentary flavors. And this pie brings that pairing to life in a sweet way. I recommend searching for the sweetest melon you can find. (That may likely be a seeded melon, which is fine because the juice gets trained.) The fuller in flavor the watermelon is, the more melon-flavored your pie will be. While lime and melon do go very well together, lime can easily over power watermelon’s flavor, so starting with a very sweet, boldly flavored melon will help balance the two. For the key lime juice, you could squeeze your own, but I honestly recommend saving a few dollars and lots of time by going for the best bottle stuff around - Nellie & Joe’s Key West Lime Juice. General grocery stores like Publix and Walmart should have it in stock. This pie is also a no-bake dessert! Even though we’re into the month of September, our heat index is still in the 95 to 100 degree range so you don’t have to heat up your kitchen to make this refreshing treat. I hope you give this recipe a try and feel a little bit like a kid running up and down the street with no care in the world (other than wondering if a watermelon might be sprouting in your belly….).


watermelon key lime pie

Makes 1 (10-inch) pie

Crust:

  • 1 (8.8 ounce) package biscoff cookies

  • 1 cup almond meal

  • 6 tablespoons melted unsalted butter

  • 2 ounces melted dark chocolate

Filling: 

  • 2 cups watermelon juice (about 1 pound watermelon flesh, pureed and strained through a sieve)

  • ½ cup white sugar

  • ½ teaspoon kosher salt

  • 1 (14-ounce) can sweetened condensed milk

  • ¾ cup key lime juice

  • 2 large eggs

  • 2 tablespoons cornstarch

Method

  1. CRUST: Place cookies in a food processor and process until very finely ground. Add almond meal and pulse until combined. With processor running, slowly add melted butter. Stop and scrape sides of work bowl. With processor running again, add chocolate and continue mixing until fully combined. Brush a 10-inch pie plate lightly with oil or spray with non-stick baking spray. Press cookie crumb mixture into the bottom and up the sides of the pie plate. Freeze while you make the filling.

  2. FILLING: Reserve 3 tablespoon watermelon juice in a small bowl. Add remaining juice along with sugar and salt to a small pot. Bring to a simmer over medium heat. Simmer for 5 minutes; remove from heat. 

  3. In a large bowl, whisk together condensed milk, lime juice, and eggs. Slowly whisk 1 cup of hot juice into milk mixture until fully combined. Whisk milk mixture into pot until fully combined. Return to medium heat and cook, whisking frequently for 5 minutes. 

  4. Whisk cornstarch into reserved watermelon juice until fully dissolved. Whisk into pot. Continue cooking, whisking constantly until mixture bubbles and thickens, about 5 more minutes. (Whisk should leave a defined trace and mixture should be about the thickness of pudding.) Pour into pie crust. Let cool at room temperature for 30 minutes. 

  5. Refrigerate, uncovered, for 6 hours or overnight. Top with sweetened whipped cream and lime zest before serving.


Watermelon Key Lime Pie_042_sRGB.jpg
Watermelon%252BKey%252BLime%252BPie_008_sRGB.jpg
In Dessert, Pie, Recipe, Summer Tags Watermelon, pie, Dessert, Summer, key lime
Comment

Blueberry Cardamom Pie

June 30, 2019 Sarah Ward
Blueberry Cardamom Pie_019_sRGB.jpg

There isn’t much that feels more summery to me than a crispy-crusted juicy-centered blueberry pie. This particular recipe is one that has been a go-to in my recipe notebook for the past 5 years. I’ve been meaning to get it up on the blog so all of you can enjoy it too, and I’m glad I finally stopped procrastinating so y’all can enjoy it, too!

Roasted Sugar

This method requires white, granulated sugar. Cane, raw, or semi-refined sugars do not work as the granules are coated in molasses which may cause the sugar to burn or clump in the oven.

To make Roasted Sugar:

1. Heat oven to 320°.
2. Fill a ceramic or glass baking dish 2-inches deep with white granulated sugar. Place in oven and roast, stirring every 30 minutes, until sugar is a light tan, about 2 hours.

Want to know more? Here’s a more detailed recipe and how-to from Food52!

When retesting to confirm final measurements and times for this recipe, I decided to see if there were any ways I could improve the overall enjoyment of this pie without changing its flavor profile. I opted for using Roasted Sugar instead of plain granulated sugar. What this did for the overall flavor of the pie is remarkable while staying subtle. It essentially builds a strong foundation of flavor without stealing the spotlight from the fruit and cardamom. Using Roasted Sugar isn’t going to give you a noticeable flavor burst like adding almond extract or something similar would, but instead it adds a rich, slightly nutty sweetness to the pie versus simply increasing the glucose content and making it just plain ‘ole sweeter.

If you’re saying “Um, what are you even talking about, you can roast sugar?” the answer is “I know, it sounds weird, but yes!” Essentially, you are slowly caramelizing the sugar particles in the oven, while keeping them in their pantry-stable granulated form. Typically, this flavor is introduced to sweets by cooking sugar into a form of caramel on the stove top. But, this changes the molecular structure of the sugar and it can’t always be used in the same ways granulated can. Roasting the sugar brings out those same flavors while keeping the sugar in a form that can be creamed into fats for cakes and cookies, or used as it is here: stirred into the filling and worked into the pie crust.

In regards to the other maybe-weird ingredient in this pie: If you aren’t familiar with cardamom, it’s definitely a spice worth keeping in your pantry. (Confession, I first typed that as “panty” and I think it was really funny, so I’m sharing.) You can find already ground cardamom pretty easily in grocery stores these days. If you don’t think you’ll use it often, opt for buying the seeds (not the pods), and grind them when you’re ready to cook with it. It’ll taste much better. Penzey’s has the most flavorful cardamom in my opinion. (BUT, you should try Diaspora Co.’s heirloom cardamom when it’s on the market in August!)


blueberry cardamom pie

Makes 1 (9-inch) pie

ingredients

  • ¾ cups Roasted Sugar* (see above)

  • ⅓ cup tapioca flour

  • 4½ cups fresh blueberries

  • 1 tablespoon fresh lemon juice

  • 1½ teaspoon ground cardamom

  • Classic Pie Dough (recipe follows)

  • 1 large egg, lightly beaten


method

  1. Preheat oven to 425°.

  2. In a large bowl, whisk together sugar, tapioca flour, and cardamom. Mix in blueberries, lemon juice, and vanilla. Set aside.

  3. Let pie dough stand at room temperature for 10 minutes. (This softens the dough slightly, so it’s easier to roll.) On a lightly floured surface, roll one disk of dough into a 12-inch circle. Transfer to a 9-inch pie plate, pressing into bottom and up sides. Fill with blueberry mixture.

  4. Roll second disk of dough into a 14x9-inch rectangle. Cut dough into 2-inch-wide strips. Arrange strips in a lattice design on top of filling. Trim dough to extend 1 inch beyond edge of pie plate, if necessary. Fold edges over, pressing to seal, and crimp as desired. Brush with egg, and sprinkle lightly with additional sugar, if desired.

  5. Bake for 10 minutes. Reduce oven temperature to 375°, and bake until crust is golden brown and filling is bubbly, 45 to 50 minutes. Let cool for 2 hours before serving. Store pie covered at room temperature for up to 2 days.

Classic Pie Dough

Makes 1 (9-inch) double crust pie

ingredients

  • 2¾ cups all-purpose flour

  • 2 tablespoons Roasted Sugar*

  • ½ teaspoon kosher salt

  • 1 cup cold unsalted butter, cubed

  • ⅔ cup ice water

  • 1 tablespoon bourbon

method

  1. In a large bowl, whisk together flour, sugar, and salt. Using a pastry blender, cut in cold butter until largest pieces are the size of almonds.

  2. In a small bowl, stir together ice water and bourbon. Using a fork, stir in ½ cup ice water mixture until a shaggy dough forms. Add additional ice water, 1 tablespoon at a time, as necessary. (Dough should be shaggy, but still look somewhat dry.)

  3. Turn out dough onto a lightly floured counter, and shape into a disk. Cut in half and shape again. Wrap tightly in plastic wrap, and refrigerate for at least 1 hour or up to 2 days. Pie dough can be double wrapped and frozen in freezer bags. Just thaw in fridge for 24 hours before rolling. Frozen dough is best if used within 4 months.

*Regular granulated white or cane sugar can be substituted in either recipe, if desired.


Blueberry Cardamom Pie_043_sRGB.jpg
Blueberry Cardamom Pie_064_sRGB.jpg
Blueberry Cardamom Pie_068_sRGB-2.jpg
In Dessert, Pie, Recipe, Summer Tags Blueberries, pie, pie dough
Comment

Blackberry Glazed Green Beans

June 30, 2019 Sarah Ward
Blackberry Glazed Green Beans_136_sRGB.jpg

Blackberry and rosemary has long been a favorite flavor combination of mine. I’ve combined them into pies and jams on multiple occasion, as blackberries lend themselves towards sweets so easily and rosemary adds a surprising yet delicious savory note. But, I’ve been wanting to explore using them in a savory fashion. While legumes and fruit may not be the most immediate pairing that springs to mind, it’s a delicious one. These two summer treats have a short overlapping harvest period so add them to your next cookout or Sunday supper plans.

The beans in this dish are cooked until they’re crisp tender - the perfect way to eat them in my opinion - and get a sweet glaze from sticky blackberry jam. Fresh berries add pops of juicy flavor and the addition of balsamic vinegar, salt, and rosemary helps round everything out. This side dish is perfect serving alongside grilled chicken or pan seared fish.


Blackberry Glazed Green Beans

Makes 4 to 6 servings

ingredients

  • 2 tablespoons butter or oil

  • 1 large shallot, thinly sliced

  • 2 fresh rosemary sprigs

  • 1 pound fresh green beans, stem ends snipped

  • ¼ cup blackberry jam

  • 2 tablespoons white wine or water

  • 1 tablespoon balsamic vinegar

  • ½ teaspoon kosher salt

  • Pinch red pepper flakes

  • Handful fresh blackberries (optional)

  • Ground black pepper

Method

  1. In a large skillet or enameled cast-iron braiser over medium heat, melt butter. Add shallots and rosemary; saute for a few minutes until shallots begin to soften. Add green beans and cook, covered, stirring occasionally for 3 minutes.

  2. In a small bowl, whisk together jam, wine, vinegar, salt, and pepper flakes. Pour over beans and stir to coat. Continue cooking, stirring frequently until beans are crisp tender and sauce thickens to a syrupy consistency, about 3 minutes. Toss in fresh blackberries, if desired, and cook for another minute. Remove from heat. Finish with freshly ground black pepper and serve immediately.

Blackberry Glazed Green Beans_023_sRGB.jpg


In 10 Minute Recipes, Recipe, Salads + Sides, Sides, Summer Tags green beans, Blackberries, rosemary, side dish
Comment
← Newer Posts Older Posts →
 

of the dirt blog

I believe there is a necessity for us to be connected to our food. It makes us aware of seasons and life cycles. It reminds us that vital functions on earth are unplugged. It gives us a unique way to express creativity and build community. I hope the recipes and thoughts shared here Inspire you to make something delicious for someone you love (or just yourself!).


BLOG AUTHOR

Sarah Ward is the Editor of Taste of the South magazine. Currently enjoying life in Birmingham, AL with her husband and their polydactyl cat, Jack.

Sarah Ward is the Editor of Taste of the South magazine. Currently enjoying life in Birmingham, AL with her husband and their polydactyl cat, Jack.


search for recipes


Follow @ofthedirt on instagram

This weekend, a group of friends and talented bakers held another bake sale. With a short 7 days of planning and 4 days of advertising, this small group of kickass women raised over $1,000 selling hand pies, cookies, and pastries. To everyone who sup
🎉GIVEAWAY!!! Want to win a free box of homemade pastries?! There are a few ways to win: 

Birmingham Locals: 
1. Tag your local friends below and spread the word about our bake sale fundraiser. Each tag is an entry. TWO winners will be chosen tomorr
HAPPY FALL!!!!!!! It’s my favorite time of year and for the first time that I can remember, it actually feels like fall outside in Alabama! To celebrate, make a batch of these Pumpkin Oatmeal Chocolate Chunk Cookies...they use a whole jar of @t
It was 68 degrees here today and everyone was hoarding the fall products at Trader Joe’s yesterday (I actually witnessed a woman frantically grab 6 hand soaps, 5 candles, and 3 of every pumpkin-filled-treat thing they had). BUT I’ve got o
Quick pickles are one of the best flavor tools to keep on hand. They brighten up any dish - eggs, tacos, toast, salads, chili, sandwiches, pretty much anything that goes with vinegar. And, they’re so easy to make! (You don’t really even n

Let's Keep in Touch!

Get new recipes delivered right to your email. 

Thank you! Looking forward to staying in touch.

For now, head on over and say hi here. 

© Sarah Ward and of the dirt, 2017. Unauthorized use and/or duplication of the photographs and recipes without express and written permission from this blog’s author and/or owner is strictly prohibited. Excerpts and links may be used, provided that full and clear credit is given to Sarah Ward and of the dirt with appropriate and specific direction to the original content.