• Home
  • Blog
  • Basics + Pantry Staples
  • Preservation
  • Desserts & Sweets
  • Breakfast
  • Entrees & One-dish Meals
  • Salads + Sides
  • Soups & Stews
  • 10 Minute Recipes
  • About
  • Say Hello
  • Portfolio
Menu

of the dirt

Street Address
San Diego, CA
Phone Number
an exploration of food and culture

Your Custom Text Here

of the dirt

  • Home
  • Blog
  • Recipes
    • Basics + Pantry Staples
    • Preservation
    • Desserts & Sweets
    • Breakfast
    • Entrees & One-dish Meals
    • Salads + Sides
    • Soups & Stews
    • 10 Minute Recipes
  • About
  • Say Hello
  • Portfolio

Butternut Squash Rose Quiche

March 7, 2019 Sarah Ward
_MG_8150_sRGB.jpg

Butternut Squash Rose Quiche

Makes 1 (9-inch) quiche

ingredients

  • Rosemary Pie Dough (recipe below)

  • ¼ to ⅓ pound butternut squash shavings (see How To below)

  • 2 tablespoons butter

  • 1 cup roughly chopped mushrooms

  • 1 small leek

  • Kosher salt

  • Ground black pepper

  • ⅓ cup shredded or crumbled cheese (anything works!)

  • 4 large eggs

  • ¼ cup milk

method

  1. Preheat oven to 425°.

  2. Roll pie dough into a 12-inch circle. Place in a 9-inch pie pan and trim edges to extend 1 inch beyond the rim. Tuck edges under and crimp. Freeze while making rosettes.

  3. Roll one or two strips of butternut squash together like a cinnamon roll. Depending on the tightness of your roll, you’ll need 35 to 40 roses. Place roses to the side.

  4. Place pie pan on a rimmed baking sheet and line pie dough with parchment paper. Fill with pie weights or dried beans. Bake for 10 minutes. Reduce oven temperature to 350°.

  5. In a large frying pan, melt butter over medium-high heat. Add mushrooms and cook until lightly browned, about 5 minutes, stirring frequently. Add leeks and cook until tender, about 4 minutes. Season with salt and pepper. Carefully remove parchment and pie weights from crust. Spread mushroom mixture in the bottom of the crust. Sprinkle with cheese. Place butternut squash roses on top, open end facing up some space between them.

  6. In a large bowl, whisk together eggs, milk, ½ teaspoon kosher salt, and ¼ teaspoon pepper. Carefully pour egg mixture into pie. (try pouring between the roses to keep the tops from being covered with egg.)

  7. Bake for 45 to 50 minutes, or until edges of crust are golden brown and center is firm and set. Serve immediately.

rosemary pie dough

Makes 1 (9-inch) single-crust pie

ingredients

  • 1 ½ cups all-purpose flour

  • 1 teaspoon sugar

  • 1 teaspoon powdered dried rosemary

  • ½ cup cold salted butter, cubed

  • ⅓ cup ice water

method

  1. In a large bowl, mix together flour, sugar, and rosemary. Toss in butter cubed. Cut in using a pastry blender or use your hands by pressing cubes between your thumb and pointer finger. Continue until butter pieces are small, about the size of a small lima bean. Pour water over flour mixture and slowly fold in using a fork. Continue until a shaggy dough forms and only a small bit of flour remains loose and crumbly.

  2. Shape dough into a disk, folding dough over itself a few times if needed, and wrap tightly in plastic wrap. Chill for 1 hour or up to 2 days.

FullSizeRender 4.jpg

How to Make Butternut Squash Roses

Using a vegetable peeler, remove outer skin of squash. Working from one end to the other, shave long strips of squash. Place a piece of squash flat on your cutting board and roll tightly from one short end to the other. Place roll on the end of another strip and roll the strip around it. Repeat until enough roses have been made to cover the pie’s bottom.


_MG_8179_sRGB.jpg
_MG_8205_sRGB.jpg
_MG_8267_sRGB.jpg
In Breakfast, One Dish Meals, Pie, Recipe, Winter Tags quiche, Breakfast, Butternut Squash, winter, Eggs
Comment

Kohlrabi and Root Vegetable Hash

March 30, 2017 Sarah Ward

If you read the title and had a confused look at the word "kohlrabi" then you aren't close to being alone in that reaction. However, I would venture to say the chances that you've crossed paths with kohlrabi before are probably high if you frequent winter farmers markets or entered Whole Foods recently.  Kohlrabi is kind of like the cute black sheep of the cabbage family - doesn't look much like a cabbage at all but is rather beautiful and unique to its self in appearance and texture (see image below). Kohlrabi is mostly grown for its bulbous bottom but all parts of the plant are edible. When the crunchy bulb is consumed raw, its relation to cabbage becomes evident with the family's signature sweet and peppery taste. Kohlrabi is also an incredibly nutritious cool-weather crop, packed with fiber and Vitamin C. 

Curious about trying the delicious black sheep cabbage cousin? This breakfast hash recipe is the perfect introduction! Peppery bits of kohlrabi are well balanced with the sweetness of parsnips and sweet potatoes. And if cooked in a cast iron skillet, you'll get to enjoy lots of crispy bits as the vegetables cook in bacon drippings. If there were any doubts about love at first reading, the addition of lots of fresh rosemary and perfectly soft-baked eggs should fix that issue.

You can find the full recipe on Bonnie Plants' website and by clicking the button or image below. Happy breakfast feasting! 

get the recipe!
In Bonnie Plants Recipes, Breakfast, Winter, Spring, One Dish Meals, Recipe Tags Breakfast Hash, Root Vegetables, Kohlrabi, Sweet Potato, Parsnip, Eggs
Comment

Rhubarb Baked Oatmeal

October 22, 2016 Sarah Ward

My brother and sister-in-law recently returned from Iceland and they came back with a (supposed...eh hem) recipe for a traditional rhubarb and oat pie/cake. Since I have yet to see this recipe I will continue to guilt trip them into sharing it with me....especially if Henry wants me to make it for his birthday! Little-sistering aside, I did some research of my own and found a traditional cake called Happy Marriage Cake using rhubarb, jam and an oatmeal based batter. While I'm never one to shy away from cake for breakfast (because you're actually crazy if you do), it's not always the best life choice. So, I let it influence a heart healthy but still super tasty breakfast recipe.

Baked oatmeal is one of my go-to breakfasts for a crowd. It's also a great thing to make ahead for a quick breakfast during the work week. I will admit, I'm not really a big traditional oatmeal fan. If you're with me on team "I hate eating things that make me feel like a baby bird..." then we probably have similar feelings about oatmeal. Baked oatmeal, however, is a love of mine. It's hearty and chewy and not at all watery or porridge like - it's more like eating Thanksgiving dressing (<-- look it up if you're like "um, what?") or a really giant chewy oatmeal bar. I haven't made it enough lately, but I'm happy to have dug out my oatmeal baking mitts to share something warm and hearty with you! 

If you don't have (or like) rhubarb, you can substitute a ton of different fruits - sliced apples, pears, strawberries, persimmons, plums, blueberries, etc. This recipe calls for milk and an egg, but if you want to make it vegan, you can leave the egg out. The oatmeal will have a bit of a looser texture, but that's about the only real difference. I used unsweetened almond milk for my baked oatmeal and it worked really well. Any kind of dairy, nut or grain milk should do. 

Don't forget: Share your baked oatmeal dishes on Instagram with #ofthedirtrecipe or tag @ofthedirt!


Rhubarb Baked Oatmeal

  • 2-3 large stalks of rhubarb
  • 2 cups rolled oats
  • 1/4 cup coconut sugar (or sweetener of your choice)
  • 1/2 tsp ground cardamom
  • 1 tsp ground cinnamon
  • 2 tsp ground ginger
  • 1/4 tsp kosher salt
  • 2 cups milk (cow, almond, soy, etc.)
  • 1 egg
  • 1/2 tsp almond extract
  • 1 tsp vanilla extract
  • Honey (optional)
  • Chopped fruits and nuts for serving (optional)

Spiced Yogurt

  • 5-6 oz Icelandic skyr or greek yogurt (plain or vanilla)
  • 1/4 tsp ground cardamom
  • 1/4 tsp ground cinnamon
  • 1/4 tsp vanilla extract (optional)
  • 1 Tbsp honey (optional)

Preheat your oven to 350 F.

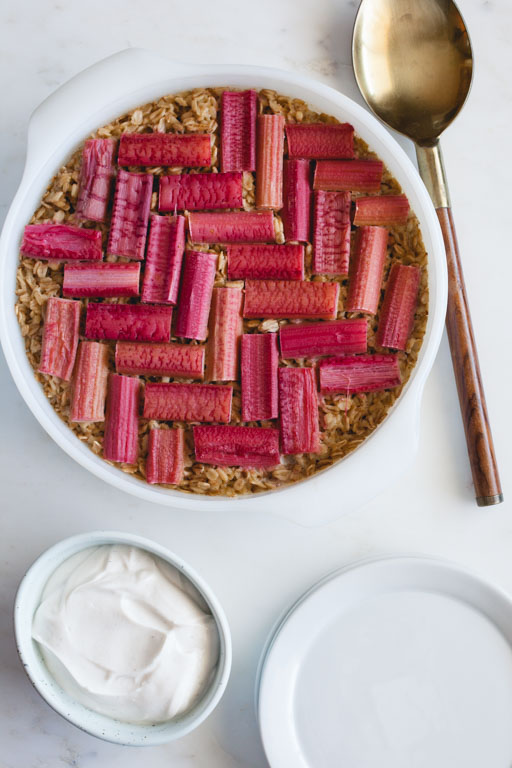
Cut rhubarb into 1-2" lengths. If your stalks are on the thicker side, carefully cut them in half length wise. This will insure they become tender during baking. Set aside.

Combine rolled oats, cardamom, cinnamon, ginger, sugar and salt in a bowl and stir to thoroughly combine. If you are choosing to use a liquid sweetener like maple syrup or honey rather than sugar, wait to add it into the milk. Pour oats into a 9" round baking dish or small casserole pan and spread even.

Whisk together milk, egg, almond and vanilla extract (and liquid sweetener, if appropriate). Pour over the oats. Arrange the rhubarb slices in any decorative manner you wish. 

Cover the pan tightly with foil and bake for 40 minutes. Uncover and bake for an additional 5 minutes. Remove from the oven and rest for 10 minutes. 

While the oatmeal is baking, mix together skyr, spices, extract and honey. Set aside until ready to serve. This can easily be made ahead of time and kept in the fridge.

Serve a scoop of the baked oatmeal, warm, with a loving dollop of spiced skyr, chopped nuts/fruits and a drizzle of honey. 

Yield: 6-8 servings
Baked Oatmeal_Honey Drizzle_small.gif
Baked Oatmeal with Rhubarb_007_sRGB.jpg
In Breakfast, Fall, Recipe, Spring Tags rhubarb, iceland, oatmeal
Comment

Roasted Strawberry + Fennel Scones

March 21, 2016 Sarah Ward
Featured: Strawberries
When ripe, strawberries should have a strong sweet aroma, rich coloring, and a sweetness that virtually melts in your mouth. I like to look for smaller berries, as they tend to be sweeter than the large ones. A hint for looking for a well ripened strawberry - look to see if the flesh is red all the way to stem's base. Many times when you purchase strawberries in the supermarkets out of season, they will be mostly white at the top. This is a sign that the berry likely doesn't have much flavor and will be white through most of the inside.

Nutrition: Rich in Vitamin C, dietary fiber and manganese. Also a good source of potassium and folate. 

Season: Depending on climate/region, harvest can begin as early as March and go into November. 

We officially ushered in Spring yesterday, with the weather in San Diego being it's "perfect" 72 and sunny. While I'm personally mourning the passing of my favorite weather seasons, I'm gleefully rejoicing in the arrival of my favorite food seasons, Spring and Summer. And the best way to celebrate the arrival of these wonderful food seasons? By eating. Duh. 

Strawberries are one of the first fruits to arrive in our markets in the spring and boy do I get excited over them. The sweet, melt-in-your-mouth goodness of a ripe strawberry compares pretty much to...well, nothing. So, to celebrate this Spring goodness, tastebud party inducing berry of deliciousness, I've put them in one of my favorite breakfast items - the (can't ever just eat one) scone. Being honest with you upfront, scones take a little time (and get a bit messy), but they are much easier to make than most people think and are 100% worth it. 

Now, some of you might be unsure about the idea of fennel being in a scone, or maybe anything you eat, but trust me on this one. The fennel flavor won't knock your socks off from licorice-ness. Instead, you'll be delighted with a lightly flavored, highly aromatic, very yummy piece of Springtime breakfast heaven. Oh yeah, and roasting the strawberries will make your kitchen smell AMAZING. 


Roasted Strawberry + Fennel Scones

  • 1 pint fresh strawberries
  • 1/4 tsp vanilla extract 
  • 1/4 cup cane sugar + 1 Tbsp 
  • 2 cups all-purpose flour + some for dusting
  • 1/4 tsp salt
  • 1 Tbsp baking powder
  • 1/2 tsp baking soda
  • 1 Tbsp ground fennel 
  • 6 Tbsp cold butter, cut into small pieces
  • 1/2 cup whole milk ricotta cheese
  • 1/4 cup half & half or whole milk + 1 Tbsp set aside
  • Fennel Sugar (1/2 Tbsp cane sugar + 1/2 tsp ground fennel, mixed)

Preheat oven to 425 F. 

Hull and cut the strawberries into roughly 1" chunks. Toss them with 1 tablespoon cane sugar and 1/4 teaspoon vanilla extract. Spread out on a lined baking sheet, giving the strawberries as much room between each other as possible.

Roast for 15 minutes. Remove from the oven and transfer the strawberries to a bowl to cool. Drop the oven temp to 375 F. 

In a large mixing bowl, combine all dry ingredient, minus the butter and fennel sugar, and stir to throughly combine. Add the butter and work it into the flour using a pastry cutter, or two butter knives, until no large pieces remain. The texture should resemble large bread crumbs (about 3-5 minutes using a pastry cutter). 

Mix the ricotta and milk together until the texture is mostly smooth. Add to the flour mixture and begin gently folding everything together with a fork. Fold about 8 times, just until the wet and dry ingredients are beginning to come together. Add in the strawberries. Mash with the fork or switch back to the pastry cutter as you mix them in to break the strawberries up, and blend 6 to 8 times. At this point, the dough will be sticky but crumbly. 

Lightly flour a smooth surface or large cutting board. Carefully empty the scone mixture onto the floured surface. At this point, you will finish the process with your hands (things will get a bit messy, but that's part of the fun). Gently fold and press the mixture together, working the bits of dry goods into the sticky areas of dough. Be cautious that you aren't kneading the dough - your dough should come together after 6 to 8 gentle folds. Sprinkle the top with additional flour as needed to help keep the dough from sticking to your hands or the work surface. The dough will look a bit cracked and flakey when finished, but you'll know it's done with the dough is holding together as one mass. 

Gently press the dough into a 1.5" thick circle. Cut into 8 pie shaped pieces and transfer them to a parchment lined baking sheet. Brush the top of each scone with the remaining milk. Generously sprinkle them with fennel sugar and place the pan in the middle of your pre-heated oven. 

Bake the scones for 14 - 16 minutes or until the edges just begin to brown. Remove from the oven and transfer the scones to a cooling rack. Let them cool for at least 10 minutes - you may have to reach in deep for some self-restraint (or maybe that's just me...). Serve warm as is, or with butter and jam.  

Makes 8 scones
In Recipe, Spring, Breakfast Tags Strawberries, Roasted Strawberries, Fennel, Fennel Seeds, Scones, Breakfast
Comment

Natural Peach Preserves: Vanilla + Cinnamon & Almond + Ginger

August 13, 2015 Sarah Ward

Peaches are probably my favorite thing about summer. Humidity, no thanks. The AC-free state of life in southern California, double no thanks. But peaches...they make both of those things okay. Personally, I think the best peaches are grown in southern soil. Maybe it's that everything in the south seems to be made of sugar, so they're just genetically sweeter :). Or maybe I'm just biased. I don't know, but I will say this; while California peaches may not be my favorite fresh eating peaches, they are wonderful for cooking.

One of the best kept secrets of my neighborhood farmers market (farmers'? farmer's? hm....) is the organic stone fruit farm that puts everything on sale 30 minutes prior to closing. All of their delicious goodies are half price! Such a deal. BUT WAIT. After close, you can pay $10 for a plastic grocery sack and fill it with as many fruits as it can hold. This is where the gold is, and where I stock up for canning. Summer flavors all year long? Yes, please.


Natural Peach Preserves

This recipe is for a basic, naturally flavored peach preserve. It serves as a great canvas for additional flavoring post-cooking, though delicious as-is if you're wanting to keep the pureness of the peaches.  For the following post, I split the cooked batch in half and flavor each one with different spices.

  • 8 cups peaches, skinned and cut into small pieces
  • 2 cups raw cane sugar
  • Juice of 1 lemon

In a medium sized pot on medium-high heat, combine all ingredients and stir thoroughly. A nice juice will start to develop as the sugar draws out the natural nectar of the peaches. Bring the mixture to a simmer, stirring occasionally and lightly mashing the peaches as they cook. Simmer for 10 minutes. Emulsify the mixture with a stick blender. Be careful to keep the blade fully submerged so you don't splash yourself with the hot peaches. I like to keep some of the natural fruit texture in my preserves, so I leave a few chunks, but this is entirely up to your liking - blend more or blend less, chefs' choice! Once emulsified, cook for 3 more minutes. Remove from heat and flavor or cool for storage. 

I can my preserves so I have them on hand and keep those sweet summer tastes available throughout the year. If canning isn't your preference, the preserves can last up to two weeks in the fridge or several months in the freezer.

Almond + Ginger  

  • 4 cups natural peach preserves
  • 1 tsp almond flavoring
  • 1 tsp freshly grated ginger
  • 1/4 tsp ground cardamom

Vanilla + Cinnamon

  • 4 cups natural peach preserves
  • 1/4 tsp ground cinnamon
  • 1/2 vanilla bean


Combine all ingredients and stir thoroughly. For long-term storage, can via water bath method (step-by-step instructions found here) or freeze. For immediate use, store in the refrigerator and use within 2 weeks. 


PS - Thanks to the lovely Liz DeZeeuw for being an awesome sous chef and taste tester!

In Recipe, Summer, Breakfast, Preserved Foods, Basics & Pantry Staples Tags Peaches, Preserves
Comment
 

of the dirt blog

I believe there is a necessity for us to be connected to our food. It makes us aware of seasons and life cycles. It reminds us that vital functions on earth are unplugged. It gives us a unique way to express creativity and build community. I hope the recipes and thoughts shared here Inspire you to make something delicious for someone you love (or just yourself!).


BLOG AUTHOR

Sarah Ward is the Editor of Taste of the South magazine. Currently enjoying life in Birmingham, AL with her husband and their polydactyl cat, Jack.

Sarah Ward is the Editor of Taste of the South magazine. Currently enjoying life in Birmingham, AL with her husband and their polydactyl cat, Jack.


search for recipes


Follow @ofthedirt on instagram

This weekend, a group of friends and talented bakers held another bake sale. With a short 7 days of planning and 4 days of advertising, this small group of kickass women raised over $1,000 selling hand pies, cookies, and pastries. To everyone who sup
🎉GIVEAWAY!!! Want to win a free box of homemade pastries?! There are a few ways to win: 

Birmingham Locals: 
1. Tag your local friends below and spread the word about our bake sale fundraiser. Each tag is an entry. TWO winners will be chosen tomorr
HAPPY FALL!!!!!!! It&rsquo;s my favorite time of year and for the first time that I can remember, it actually feels like fall outside in Alabama! To celebrate, make a batch of these Pumpkin Oatmeal Chocolate Chunk Cookies...they use a whole jar of @t
It was 68 degrees here today and everyone was hoarding the fall products at Trader Joe&rsquo;s yesterday (I actually witnessed a woman frantically grab 6 hand soaps, 5 candles, and 3 of every pumpkin-filled-treat thing they had). BUT I&rsquo;ve got o
Quick pickles are one of the best flavor tools to keep on hand. They brighten up any dish - eggs, tacos, toast, salads, chili, sandwiches, pretty much anything that goes with vinegar. And, they&rsquo;re so easy to make! (You don&rsquo;t really even n

Let's Keep in Touch!

Get new recipes delivered right to your email. 

Thank you! Looking forward to staying in touch.

For now, head on over and say hi here. 

© Sarah Ward and of the dirt, 2017. Unauthorized use and/or duplication of the photographs and recipes without express and written permission from this blog’s author and/or owner is strictly prohibited. Excerpts and links may be used, provided that full and clear credit is given to Sarah Ward and of the dirt with appropriate and specific direction to the original content.