• Home
  • Blog
  • Basics + Pantry Staples
  • Preservation
  • Desserts & Sweets
  • Breakfast
  • Entrees & One-dish Meals
  • Salads + Sides
  • Soups & Stews
  • 10 Minute Recipes
  • About
  • Say Hello
  • Portfolio
Menu

of the dirt

Street Address
San Diego, CA
Phone Number
an exploration of food and culture

Your Custom Text Here

of the dirt

  • Home
  • Blog
  • Recipes
    • Basics + Pantry Staples
    • Preservation
    • Desserts & Sweets
    • Breakfast
    • Entrees & One-dish Meals
    • Salads + Sides
    • Soups & Stews
    • 10 Minute Recipes
  • About
  • Say Hello
  • Portfolio

Chocolate-Blood Orange Marble Bread

February 15, 2020 Sarah Ward
_MG_8123_sRGB.jpg
IMG_4252.jpg

I eagerly wait in anticipation for blood orange season. I know there are plenty of delicious orange varieties out there months earlier than when blood oranges hit the market (and I eat plenty of those), but there’s something special about cutting open the bright orange rind and discovering what shade of magenta- to wine-colored flesh lies inside. They are fairly easy to find at grocery stores these days, but if you can’t find them in your area or your looking for a good, small-farm provider, you can buy them from my friends at Good Taste Farm! Farmers Kris and Sarah have some of the best citrus I’ve eaten and they’ll happily ship directly to your house or office. Plus, you can sign up for monthly subscription boxes so you’ll get a tasty surprise box each month filled with goodies like limes, passion fruit, and today’s subject - blood oranges.

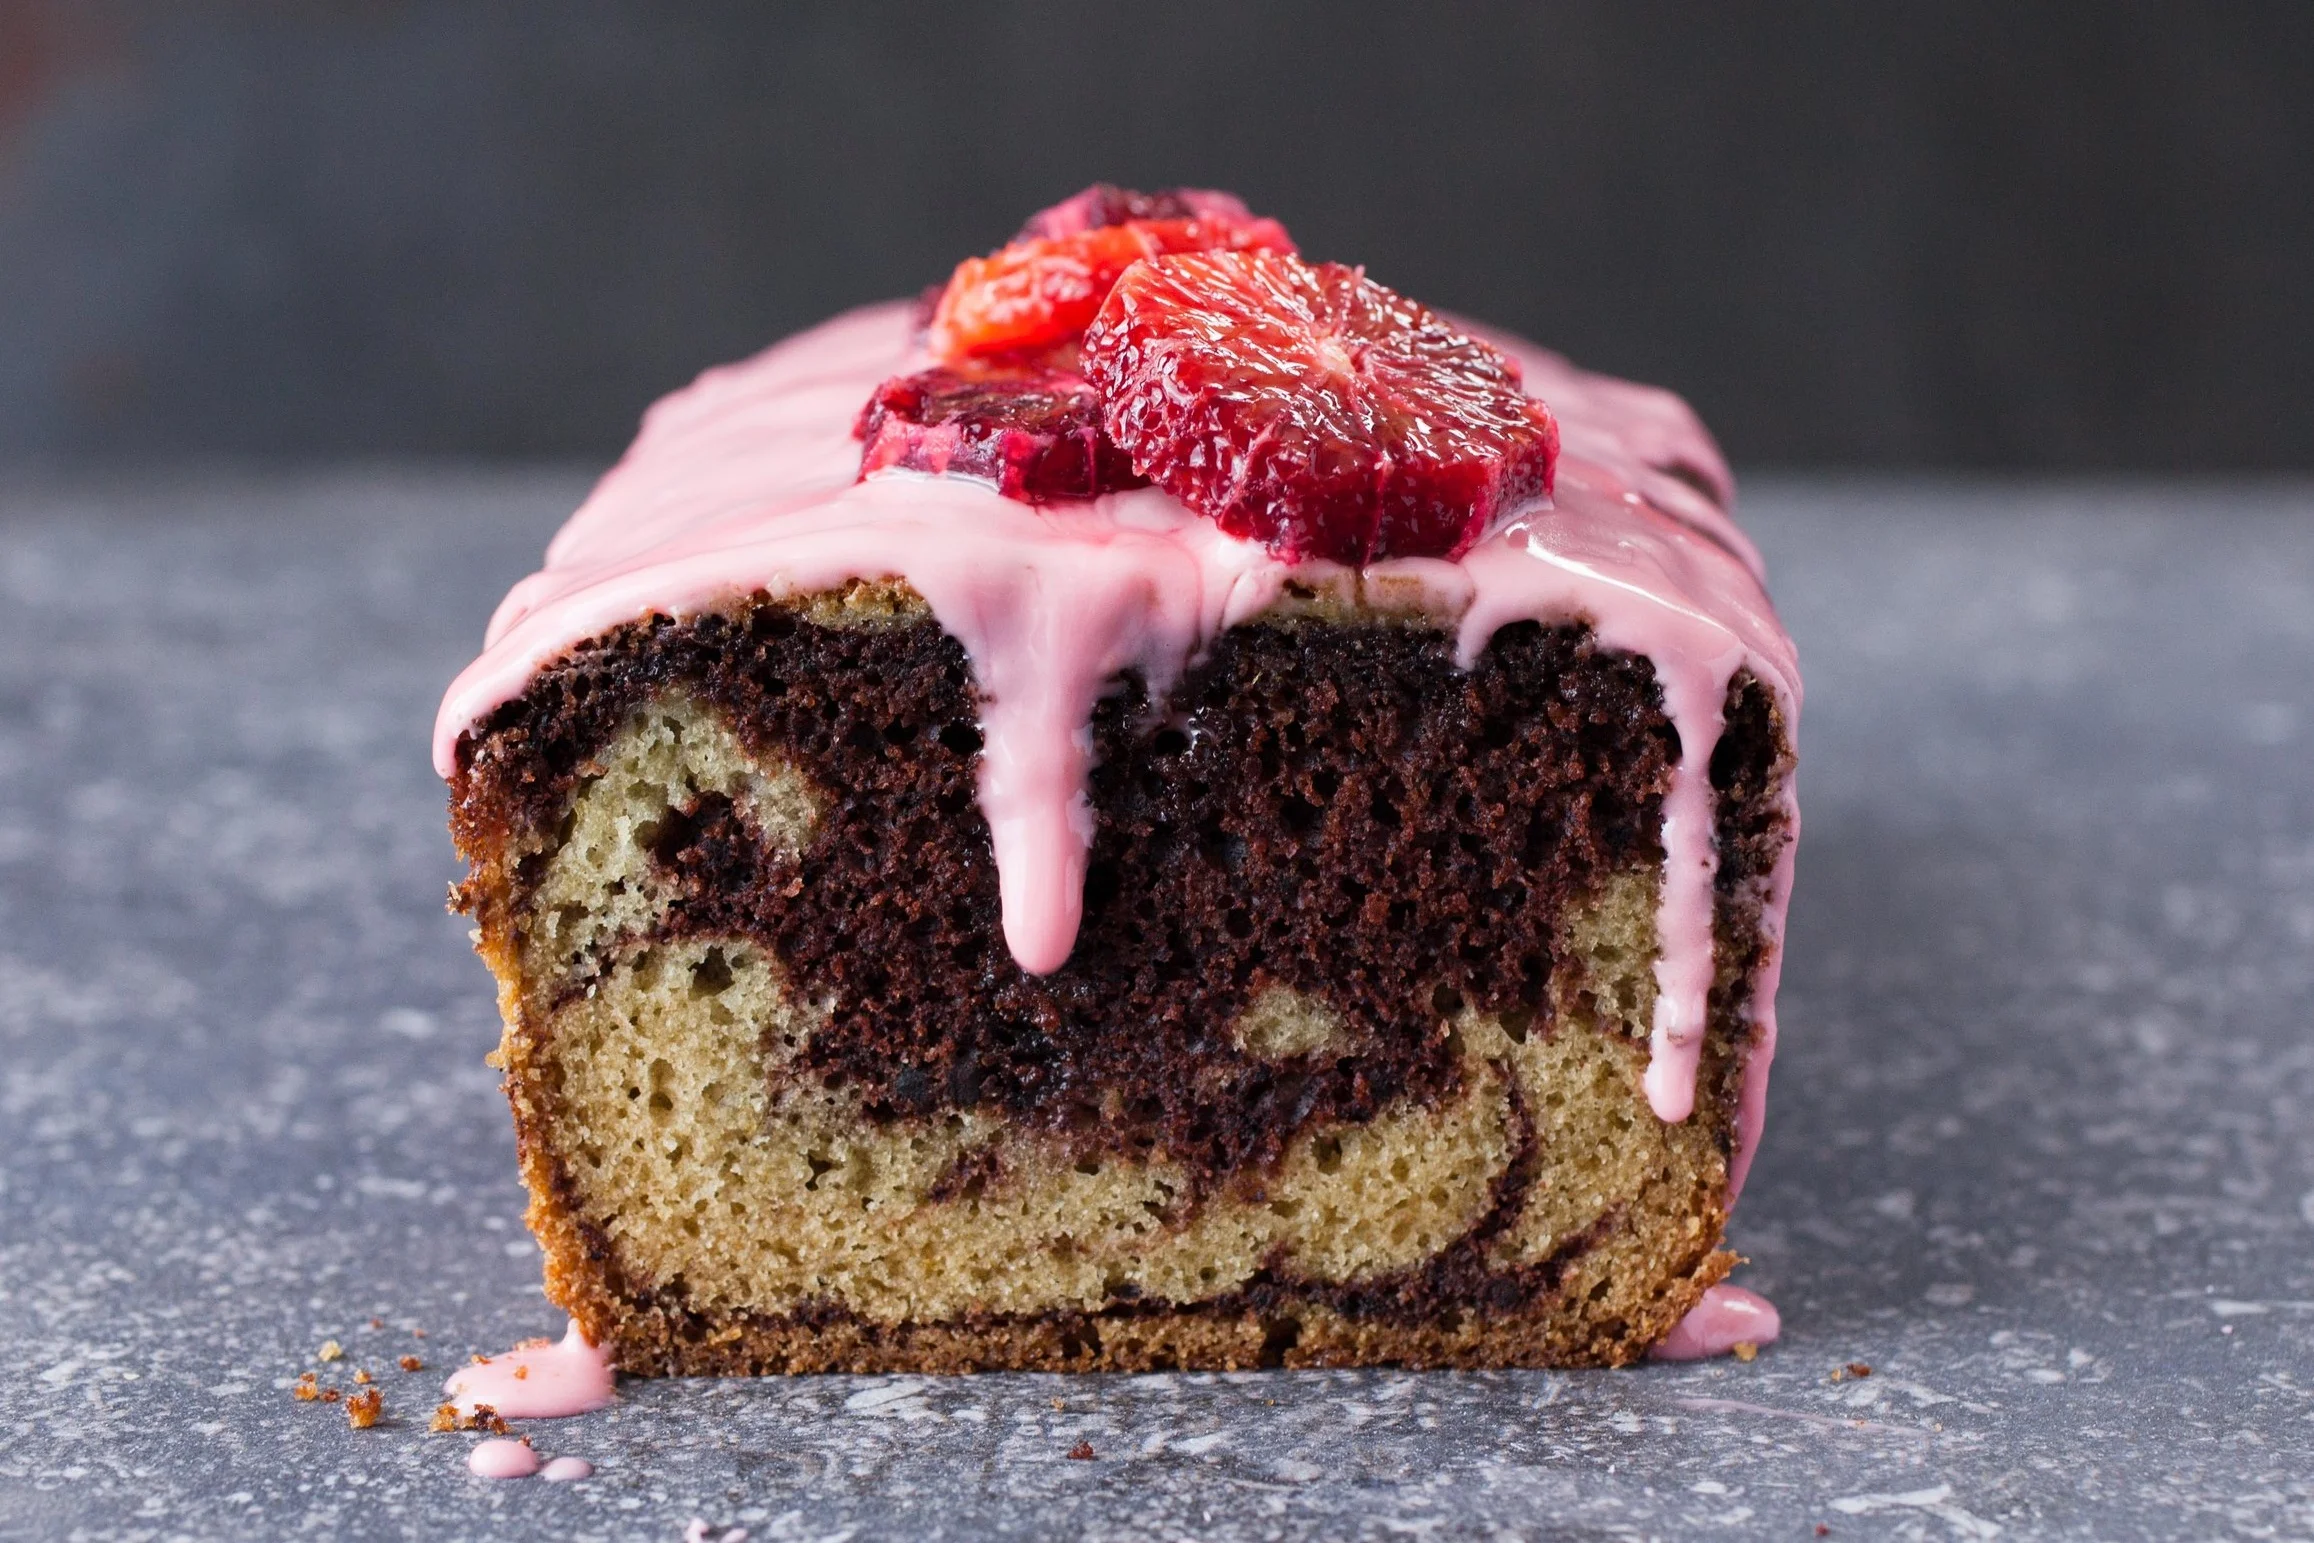
When I’m in need of something delicious but don’t have a lot of time and/or energy, I turn to quick breads. With a simple stir-together batter, this marbled style looks complicated, but it’s actually really easy. You make one batter, scoop some out, and add cocoa to one portion. No fuss, just a beautiful and tasty end result. The bright pink glaze gets its color from that magenta blood orange juice - thank you nature! You can get more creative with this recipe by adding in some spices like ginger or cardamom, adding a touch of almond extract, or stirring in some chocolate chips. Have fun with it, and happy baking!

Order Blood Oranges!

Chocolate & Blood orange marble bread

Makes 1 (8x4-inch) loaf or 6 servings

ingredients


Bread

  • 1½ cups all-purpose flour

  • ½ cup plus 2 tablespoon white sugar

  • 1 teaspoon baking soda

  • ½ teaspoon baking powder

  • ¼ teaspoon kosher salt

  • ½ cup whole milk, room temperature
    and divided

  • ½ cup salted butter, melted

  • ¼ cup blood orange juice

  • 2 large eggs

  • Zest of 1 blood orange

  • 1 teaspoon vanilla bean paste or extract

  • ½ teaspoon almond extract

  • 3 tablespoons cocoa powder

Glaze

  • 1 cup powdered sugar

  • 2 tablespoons blood orange juice

METHOD

  1. Preheat oven to 325°. Spray an 8x4-inch loaf pan with baking spray. Line sides and bottom with parchment paper letting the excess stick up over the edges.

  2. BREAD: In a large bowl, whisk together flour, sugar, baking soda, baking powder, and salt. In a separate bowl, whisk together ¼ cup milk, melted butter, ¼ cup blood orange juice, eggs, zest, vanilla paste, and almond extract. Stir butter mixture into flour mixture until combined. Reserve 1 cup batter in a small bowl; stir cocoa powder and remaining ¼ cup milk into reserved batter.

  3. Add half of plain batter to prepared pan, smoothing with an offset spatula. Pour chocolate batter over plain, mostly cover it it. Top with remaining plain batter. Gently swirl batters together using a knife.

  4. Bake for 55 to 57 minutes or until a wooden pick inserted in the center comes out with a few moist crumbs. Let cool completely in pan.

  5. GLAZE: In a small bowl whisk together powdered sugar and 2 tablespoons blood orange juice until smooth. Add additional tablespoons if a thinner consistency is desired. Top cooled loaf with glaze and blood orange slices, if desired. Bread will keep, covered, at room temperature for 2 days.


_MG_8102_sRGB.jpg
In Dessert, Recipe, Winter Tags Cake, Orange, chocolate
Comment

Golden Milk Pound Cake

September 19, 2018 Sarah Ward
Golden Milk Pound Cake_010_sRGB.jpg

There’s a not-so-secret rule in our family that you don’t mention the word “turmeric” around my dad unless you want to start a somewhat lengthy, although educational, conversation about the many benefits of the super-powered root. For this reason, I found it only fitting to bake a turmeric-ladened cake in a pan he gave me for my birthday as its inaugural bake.

This not-too-sweet pound cake contains a increasingly popular turmeric-based beverage mix called Golden Milk. Typically whisked into steamed animal or alternative milks, it has a number of valuable health properties as well as delicious flavor and beautiful color. I decided to use it here for flavor more than its health benefits (this is cake after-all…). The turmeric shines brighter in color than taste, however its low-profile earthy notes mixed with vanilla give your taste buds a magical reminder of coconut. The additional mix of cinnamon, cardamom, ginger, and black pepper give warmth to the overall flavor, rounding out the sweetness.

Included is a recipe for homemade Golden Milk Powder and a quick how-to for making yourself a beverage if you feel so inclined! You can also substitute your favorite store-bought powder in the cake recipe if you’d prefer.


GOLDEN MILK POUND CAKE

  • 2 1/2 cups all-purpose flour

  • 1/2 teaspoon kosher salt

  • 1/4 teaspoon baking soda

  • 2 tablespoons Golden Milk Powder (recipe below)

  • 3/4 cup unsalted butter, softened

  • 2 cups granulated sugar

  • 5 large eggs at room temperature

  • 1 teaspoon vanilla extract

  • 1 cup full-fat yogurt or sour cream

  • 1 1/4 cups powdered sugar

  • 2 tablespoons milk or cream

  • Ground cinnamon

Preheat oven to 325º. Spray a 15-cup Bundt pan with baking spray. (I personally love to use the Sprouts Grapeseed Oil spray.)

Whisk together flour, salt, baking soda, and Golden Milk Powder.

Beat butter on medium speed until smooth. Add sugar and continue beating until fluffy, about 3 minutes. Add eggs, one at a time, fully incorporating each before adding the next. Beat in vanilla.

Turn mixer speed to low. Add one third flour mixture, mixing just until incorporated. Add half of yogurt until just incorporated. Repeat with remaining flour and yogurt, ending with flour. (Be sure to scrape the sides of the bowl as needed.) Transfer the batter to your greased pan.

Bake on the middle oven rack for 1 hour and 15 minutes or until a wooden pick inserted in the center of the cake comes out clean. (The top will crack and the crack should look mostly dry.) Cool on a wire rack for 15 minutes. Carefully flip the cake pan upside down on the rack to remove cake. Let cool completely.

Whisk together powdered sugar and milk. (Add more milk for a thinner glaze.) Drizzle cooled cake with glaze before serving and sprinkle with cinnamon for a bit of extra spice.


IMG_6427.jpg

Golden Milk Powder

Makes about 1/3 cup

  • 2 tablespoons turmeric powder

  • 2 tablespoons ground Vietnamese cinnamon

  • 1 1/2 tablespoons ground ginger

  • 1 tablespoon ground cardamom

  • 1 teaspoon ground black pepper

Mix all spices together and store in an airtight jar in the pantry.

To make a golden milk latte: Heat 8-ounces desired milk until steaming. Whisk in 1 teaspoon Golden Milk Powder (or more to taste) until spices are fully incorporated. Sweeten to taste. Enjoy immediately.


Golden Milk Pound Cake_015_sRGB.jpg
In Dessert, Fall, Recipe Tags Cake, Pound Cake, Golden Milk
Comment

Orange Blossom & Hazelnut Teacake

April 18, 2017 Sarah Ward

The orange trees in California have been going crazy over the last few months, celebrating the massive amount of rain we received over winter. I'm not sure if you've ever had the pleasure of smelling a blooming orange tree, but it's intoxicating in the best way. There's a house a few blocks over from us that has a single tree in the front yard. On evening walks around the neighborhood, the sweet smell of its blooms fills the air before it's even in sight. This teacake is like that tree. While there are subtle floral notes in the taste, the orange blossom component has everything to do with the smell, and it fills your nose with every bite. Dense but still crumbly, it's slightly sweet and inviting the company of a slathering of jam and cup of Barry's Irish breakfast tea (because it's the best!). 

You'll notice this recipe calls for whole wheat flour, typically taboo in cake recipes as it can add too much density, leaving you without that traditional light and crumbly texture. However, I love using the ivory wheat flour in this cake. Not only does it add nutrients and a bit of protein from the whole grains, this flour adds a delicate toasty layer to the flavor profile. By nature, it does cause the cake to be denser, but that's why you whip the egg whites! This will ensure your cake achieves a nice rise and a good crumb. The addition of hazelnut flour aids in the texture and helps to keep the cake from drying out. Finished off with a brushing of orange blossom syrup, your nose and taste buds will both be thanking you for treating them so well. 

Thanks to Bob's Red Mill for supplying me with these lovely ingredients to play with! If your local grocery store doesn't carry their products you can order the Ivory Wheat flour and Hazelnut flour online!

If you aren't sure where to find orange blossom water, it's started popping up in conventional grocery stores, but any food mart that carries a good selection or specializes in Middle Eastern products should have it. You can also order it online.


Orange Blossom & Hazelnut Tea Cake

  • 1 cup Ivory Wheat Flour (or half traditonal whole wheat, half all-purpose flour)

  • 1 1/2 cup hazelnut flour (can sub with almond)

  • 1/2 tsp baking powder

  • 1/4 tsp salt

  • 2 tsp ground ginger

  • 2 tsp ground cardamom

  • 4 eggs

  • 5 Tbsp softened coconut oil

  • 3/4 cup coconut sugar

  • 2 tsp vanilla extract

  • 1/2 cup milk

  • 2 Tbsp orange blossom water

  • 3 Tbsp orange blossom syrup

Preheat oven to 350’F. Grease an 8” cake pan and line the bottom with a round of parchment paper.

Whisk together all dry ingredients (Ivory flour through cardamom) in a small bowl to remove any clumps. Set aside.

Separate the egg yolks and whites. Set the yolks aside and add the whites to a medium mixing bowl. Beat with an electric mixer on medium speed until soft peaks form. 

In an additional mixing bowl, combine coconut oil and sugar. Beat on low speed until the oil and sugar whips together and becomes *fluffy (about 2 minutes). 

*If you haven’t creamed coconut oil with sugar before, please note that it will start out looking crumbly and then clump together before becoming smooth and eventually the consistency of a thick nut butter. It takes a bit longer than creaming soft butter with sugar (so, stick with it!).

Add in the egg yolks, and beat until the color has lightened a bit and the texture is fluffy (about 1 minute). Mix in the vanilla extract and orange blossom water just until combined. 

Working on the lowest speed, beat a third of the flour mixture into the sugar mixture until the flour is mostly incorporated. Add in half of the milk and beat to combine. Continue this process in the same order with the remaining flour and milk. 

Scoop a cup of the beaten egg whites into the batter. On low speed, mix until fully incorporated. Switching from the electric mixer to a spatula, add the remaining egg whites and gently fold them into the batter by hand, just to combine. If there are a few clumps or thin streaks of whites, that’s ok. 

Pour the batter into the prepared cake pan, spreading it evenly through the pan. Place in the middle of your oven to bake for 30-35 minutes or until the top begins to form small cracks and the center has risen. 

Cool on a baking rack for 10 minutes. Carefully remove the cake from the pan and continue cooling on the rack. Brush the top with orange blossom syrup in 2 or 3 installments, allowing a few minutes between brushings so the cake to soak up the syrup. Remove the parchment paper before serving.

The cake can be eaten as is or with a hearty smothering of jam. For a dressier finish, dust the edges with powdered sugar and decorate with chopped hazelnuts and/or edible flowers. 

Orange Blossom and Hazelnut Teacake_048_sRGB.jpg
In Dessert, Recipe, Spring Tags Cake, Orange, Edible Flowers
Comment

Lavender Upside Down Cake

March 19, 2016 Sarah Ward

You know those times when you're just moving along through your days, then something really great happens and you don't totally know why but you don't question in it - instead, you just ride the high? Well, I've been riding a high for the past several months as I've had the pleasure of developing and testing recipes for Bonnie Plants. Basically, the dream. 

If you follow my blog, I'll be posting links to original recipes featured on their site. I'm excited to share not only this work with you, but also help you get to know a pretty wonderful company. Bonnie grows vegetable and herb (and a few fruit) transplants - baby plants that you can buy in local stores to grow at home! They sell tomatoes, basil, strawberries, peppers, lavender, mint....the list goes on. So, get to know Bonnie Plants, grow something of your own and make some good food. 

The first recipe I'd like to share is one I had a lot of fun developing - Lavender Upside Down Cake. This cake is delicately flavored with lavender flowers, has a spongey but dense texture, and is perfectly balance with a fresh fruit top (eh, bottom?). What I love most about this cake is that it's adaptable for all seasons - try strawberries in the spring, blue or blackberries in the summer, raspberries in the fall and citrus in the winter. You can even mix up the cake's flavor by subbing the lavender for other spices. And.....it's really easy to make. Find the recipe on Bonnie's website by clicking the picture below. 

In Bonnie Plants Recipes, Recipe, Dessert Tags Bonnie Plants, Lavender, Cake, Upside Down Cake
Comment
 

of the dirt blog

I believe there is a necessity for us to be connected to our food. It makes us aware of seasons and life cycles. It reminds us that vital functions on earth are unplugged. It gives us a unique way to express creativity and build community. I hope the recipes and thoughts shared here Inspire you to make something delicious for someone you love (or just yourself!).


BLOG AUTHOR

Sarah Ward is the Editor of Taste of the South magazine. Currently enjoying life in Birmingham, AL with her husband and their polydactyl cat, Jack.

Sarah Ward is the Editor of Taste of the South magazine. Currently enjoying life in Birmingham, AL with her husband and their polydactyl cat, Jack.


search for recipes


Follow @ofthedirt on instagram

This weekend, a group of friends and talented bakers held another bake sale. With a short 7 days of planning and 4 days of advertising, this small group of kickass women raised over $1,000 selling hand pies, cookies, and pastries. To everyone who sup
🎉GIVEAWAY!!! Want to win a free box of homemade pastries?! There are a few ways to win: 

Birmingham Locals: 
1. Tag your local friends below and spread the word about our bake sale fundraiser. Each tag is an entry. TWO winners will be chosen tomorr
HAPPY FALL!!!!!!! It’s my favorite time of year and for the first time that I can remember, it actually feels like fall outside in Alabama! To celebrate, make a batch of these Pumpkin Oatmeal Chocolate Chunk Cookies...they use a whole jar of @t
It was 68 degrees here today and everyone was hoarding the fall products at Trader Joe’s yesterday (I actually witnessed a woman frantically grab 6 hand soaps, 5 candles, and 3 of every pumpkin-filled-treat thing they had). BUT I’ve got o
Quick pickles are one of the best flavor tools to keep on hand. They brighten up any dish - eggs, tacos, toast, salads, chili, sandwiches, pretty much anything that goes with vinegar. And, they’re so easy to make! (You don’t really even n

Let's Keep in Touch!

Get new recipes delivered right to your email. 

Thank you! Looking forward to staying in touch.

For now, head on over and say hi here. 

© Sarah Ward and of the dirt, 2017. Unauthorized use and/or duplication of the photographs and recipes without express and written permission from this blog’s author and/or owner is strictly prohibited. Excerpts and links may be used, provided that full and clear credit is given to Sarah Ward and of the dirt with appropriate and specific direction to the original content.