• Home
  • Blog
  • Basics + Pantry Staples
  • Preservation
  • Desserts & Sweets
  • Breakfast
  • Entrees & One-dish Meals
  • Salads + Sides
  • Soups & Stews
  • 10 Minute Recipes
  • About
  • Say Hello
  • Portfolio
Menu

of the dirt

Street Address
San Diego, CA
Phone Number
an exploration of food and culture

Your Custom Text Here

of the dirt

  • Home
  • Blog
  • Recipes
    • Basics + Pantry Staples
    • Preservation
    • Desserts & Sweets
    • Breakfast
    • Entrees & One-dish Meals
    • Salads + Sides
    • Soups & Stews
    • 10 Minute Recipes
  • About
  • Say Hello
  • Portfolio

Roasted Brussels Sprout Leaves

February 8, 2017 Sarah Ward
Featured: Brussels Sprout Leaves
Brussels sprouts are a cruciferous vegetable, meaning they are in the Brassicaceae family which includes cabbage, broccoli, collard greens and kale and are packed with nutrition. Brussels sprouts are considered a great disease-fighting food, helping to fight against cancer, diabetes, and heart disease. 

Nutrition: Low in calories and rich in anti-oxidants, potassium, and high amounts of Vitamin K & C. They are also good sources for your daily requirements of dietary fiber, Vitamin A, manganese, potassium, folate, iron and Vitamin B6. So, basically, they're like Nature's tasty multi-vitamin. 

Season: Harvest season is between September and March in temperate climates. Sprouts and leaves become sweeter after a frost.

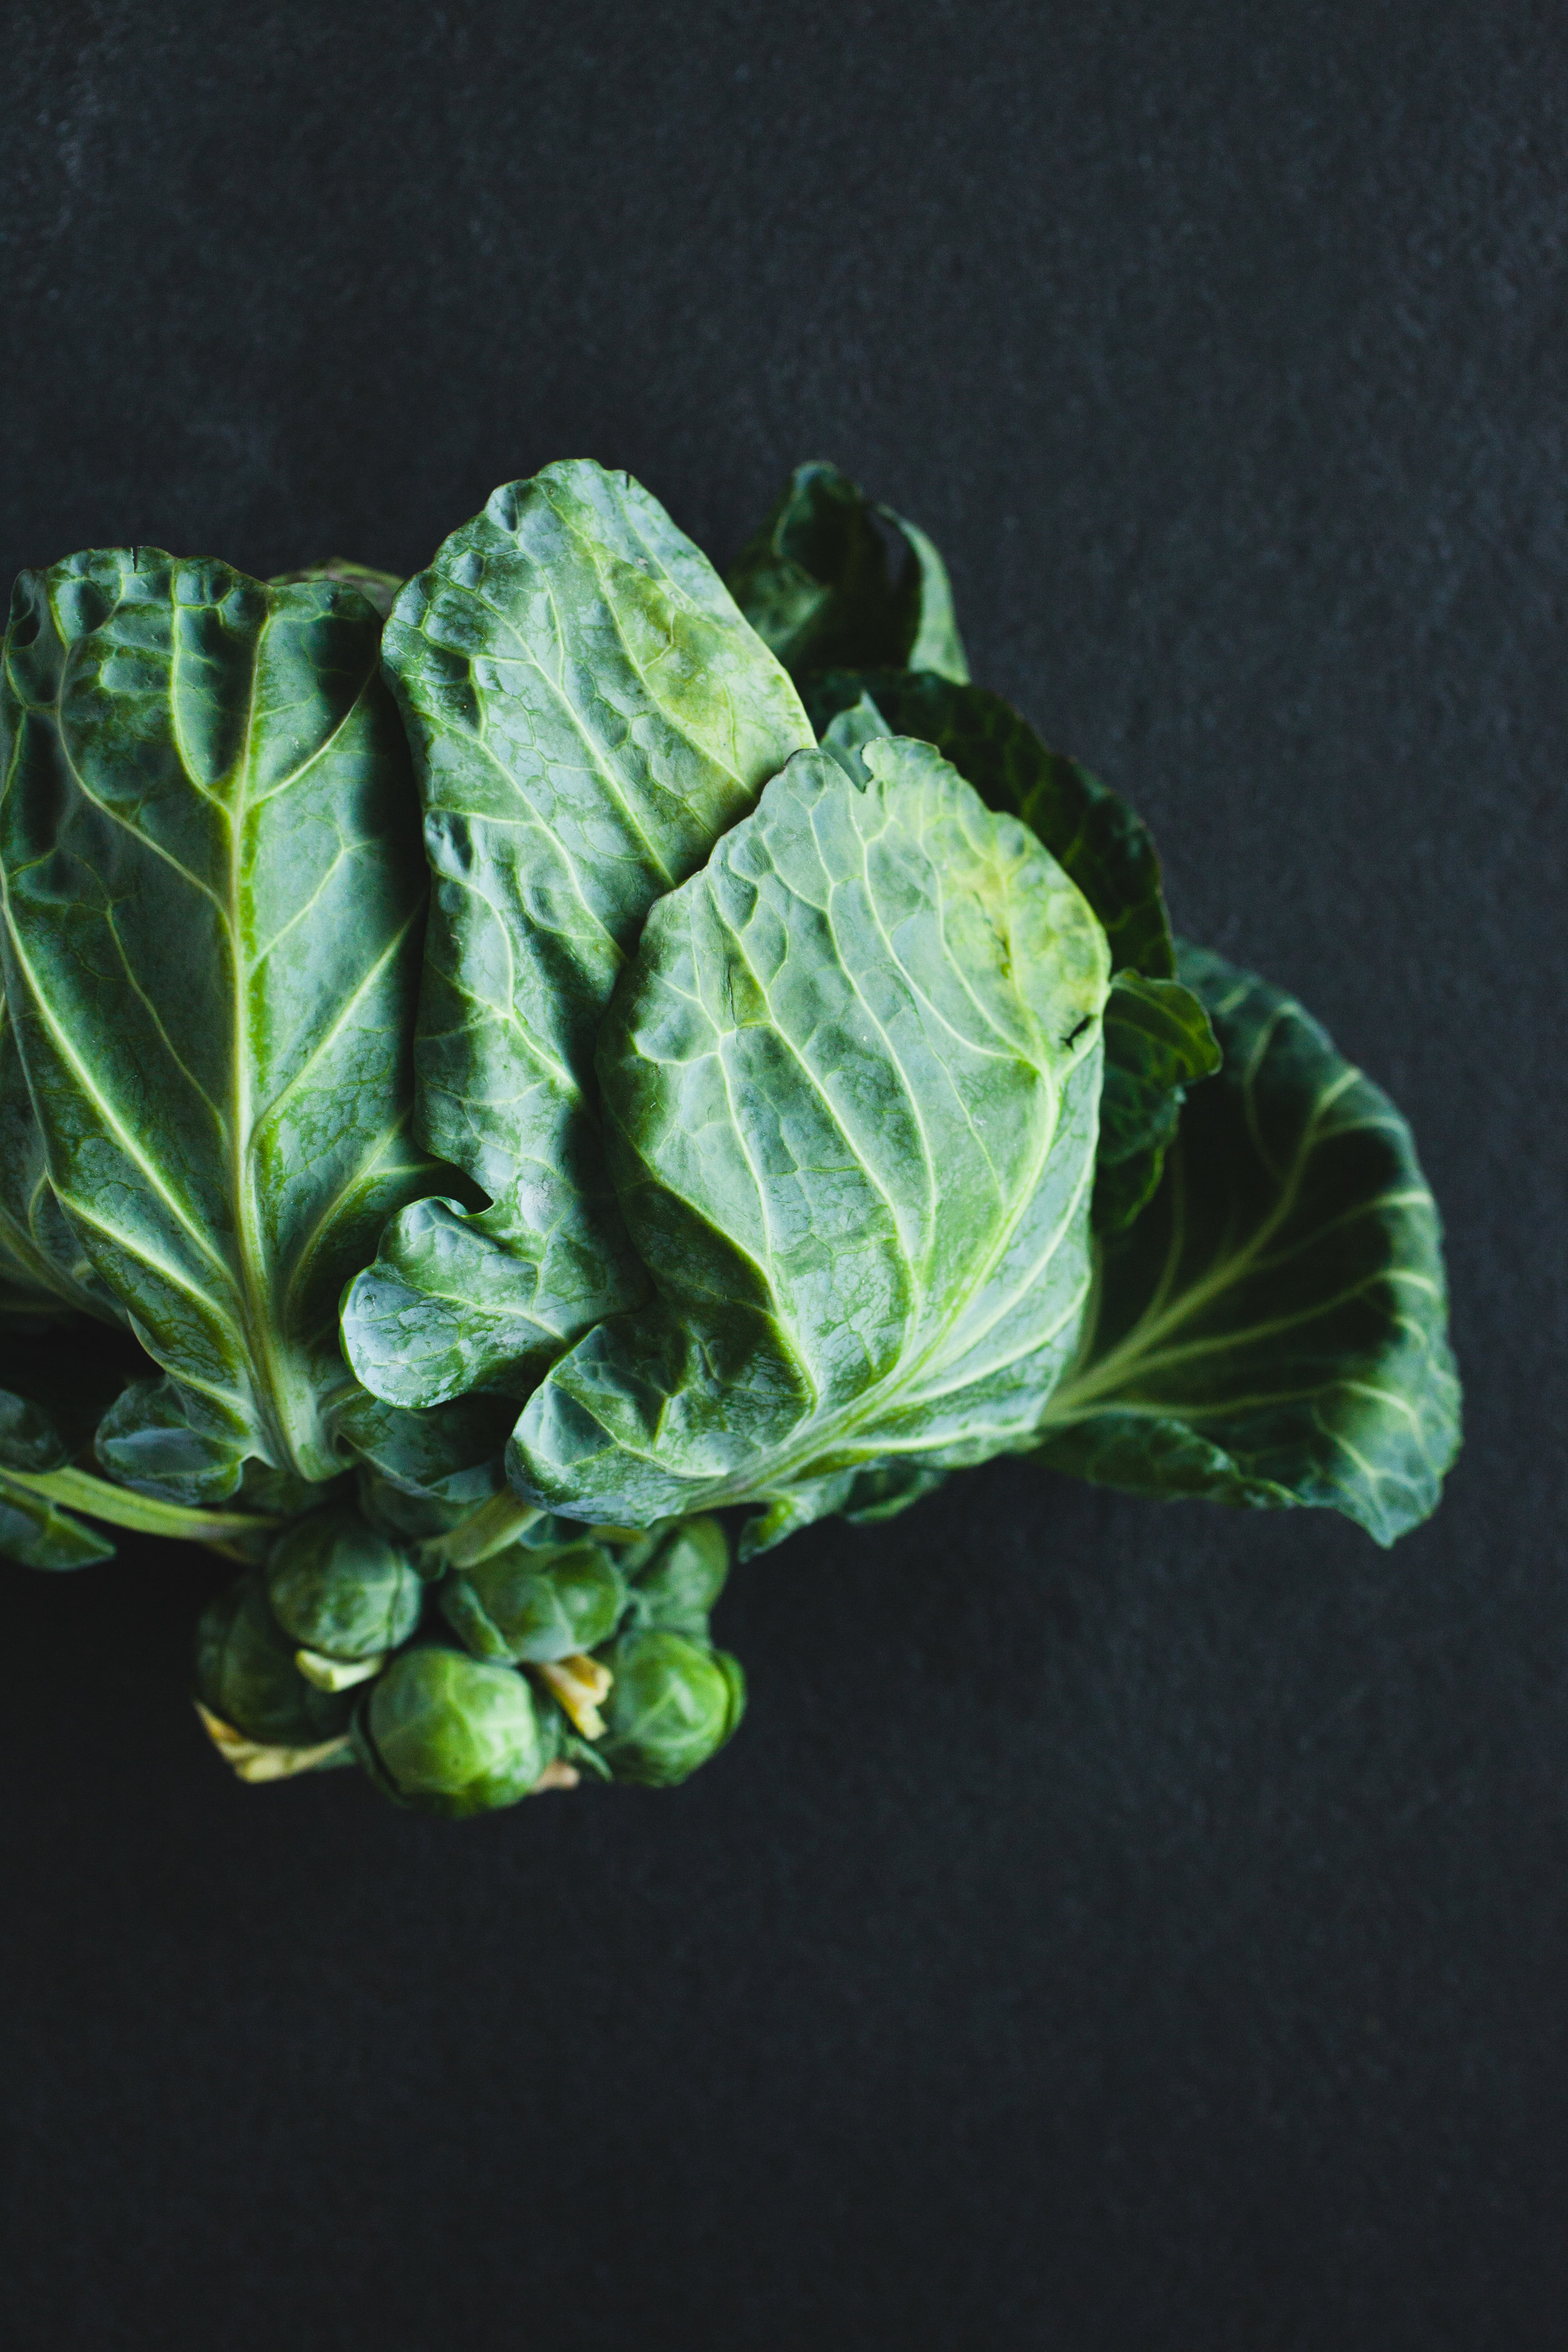
Brussels sprouts in all forms are covering restaurant menus and Pinterest pages these days, but often overlooked are the large leaves that shelter the tiny sprouts as they grow (if you're unfamiliar with how Brussels sprouts grow, check this out). The leaves are edible and just as tasty as the sprouts. They aren't typically found in conventional grocery stores, but they are popping up around farmers markets or you may have them in your own garden. The leaves can be used in the same ways as kale, cabbage or collard greens by sautéing, shredding into salads or adding to green smoothies. But what you may be even less familiar with or just walked by dismissing it as cabbage, is the top of the Brussels sprouts stalk. As the stalk grows, the leaves form a head at the top, much like a very loose head of cabbage or one giant Brussels sprout. I love the small sprouts, but I definitely think the head of leaves is where the magic is. 

To me, the best roasted sprouts are when the outer leaves get crispy but the inner core is tender and sweet. The head of Brussels sprout leaves create that partnership perfectly.  If you are growing your own Brussels sprouts or find the heads locally, try this method of roasting and treating it like one giant Brussels sprout. The recipe below is just a baseline for roasting; how you choose the finish the roasted leaves us totally up to you! I used a bunch of fresh herbs I had leftover in the fridge to make a pesto, drizzled with extra vinegar, some shaved parmesan and additional fresh herbs. This is a great way to use up leftover condiments, herbs, sauces and cheeses that you have sitting around. If you can't find the heads of leaves, a napa, savoy or red cabbage will substitute nicely. 


Roasted Brussels Sprout Leaves

  • 1 head of Brussels sprout leaves or cabbage
  • 1/2 cup balsamic vinegar
  • 2 tsp brown sugar, honey or maple syrup
  • 1/2 tsp kosher salt
  • 2 Tbsp olive oil
  • Various toppings of choice (pesto, chili oil, Sriracha, fresh herbs, cheese, etc.)

Preheat your oven to 375 F. 

Cut your head of Brussels sprout leaves or cabbage in half, from the top of the head to the stem end. Place each half cut side up on a lined baking sheet. 

In a small bowl, mix together vinegar, sugar, salt and olive oil. Pour a quarter or so of the mixture over the cut side of each half, allowing the liquid to seep in between the layers of leaves. Flip them over, cut-side down and lift any outer loose leaves, brushing the inner leaves with the mixture and all over the outside of each half. If you have any remaining vinegar, set aside for later use. 

Place the sheet pan in the oven and roast for 20-30 minutes, or until the middle is tender and the outer leaves become brown and crispy. You do not want them to burn.

Remove from the oven and serve with garnishes of your choice.  I drizzled mine with the remaining vinegar, herb pesto, fresh mint and dill leaves, and shaved parmesan cheese. 

In Recipe, Salads + Sides, Winter, Vegetarian, Vegan, Fall Tags Brussels Sprouts, roasted vegetables, vegan, vegetarian
Comment

Grandma Trigg's Cuban Black Beans

January 13, 2017 Sarah Ward

If you’ve arrived here without reading the short essay introduction, I encourage you to head over there - it really is short, I promise. If you’ve arrived here from there, I have to tell you that, for me, these beans come with so many more memories than just those of culture and heritage. Not too long after she learned to cook, my grandmother forced an untimely kitchen renovation while cooking these beans in a pressure cooker...which exploded, starting a fire in said kitchen. Or the time she managed to include some accidental ingredients in them like picture hanging wall hooks - her own unintentional version of King's Cake. Thankfully, my brother Henry didn't swallow it; however, to his dismay, he also hadn’t won a prize.  But there are also the times she would make pot after pot of beans just to give away to people who needed a hot meal. Or, all the times she would slip Jennifer (her cat..) pieces of the roasted pork she would always make along with these beans. I promise this recipe comes picture-hanger-free but with all the love of my grandmother.

This is me at the 5th grade International Fair (hellllo 90s eye glasses) setting up a table about Cuba and passing out samples of Grandma's black beans.

This is me at the 5th grade International Fair (hellllo 90s eye glasses) setting up a table about Cuba and passing out samples of Grandma's black beans.

There has to be some intentional ironic metaphor in here from Grandma about aging, but these beans really do get better with time. I recommend making them the day before you plan on eating (and hopefully sharing) them, or at least cook them and let them rest for several hours before serving. You can obviously eat them right away but trust me, it’s worth the extra bit of patience and time. I typically make a double batch so that I can freeze a few containers. They’re so easy to heat up for a quick meal, and the flavor is that much better.

Traditionally, these beans are served over white rice with fried sweet (ripe) plantains, green salad or fresh cabbage, roasted Cuban style pork and mojo covered yuca. If you forgo the whole feast, I suggest at least serving with plantains or salad, but definitely over rice. Freeze any leftovers or keep them in the fridge for up to two weeks and stir in an additional teaspoon or two of balsamic vinegar when reheating.


Grandma Trigg’s Cuban Black Beans

Makes 8 to 10 servings

ingredients

  • 3 tablespoons olive oil

  • 1 small sweet onion, diced

  • 1 bell pepper, diced

  • 1 head of garlic, peeled and minced (yes, for real; 2 if you’re a garlic lover, like me)

  • 3 cups dried black beans

  • 5 cups water

  • 3 tablespoons freshly ground cumin (4 Tbsp if using pre-ground)

  • 4 teaspoons dried oregano

  • 2 bay leaves

  • 6 tablespoons balsamic vinegar

  • 1 - 2 teaspoons kosher salt

method

  1. Heat the olive oil in a large pot over medium heat and add the onions, peppers and garlic. Sauté for about 5 minutes, just until the onions and peppers start to soften and release their juices. Add the ground cumin and continue sautéing for a couple of minutes.

  2. Add the beans, oregano, bay leaves and water. Stir until all of these ingredients are well combined. Reduce the heat to the lowest setting and slowly bring to a low simmer. Cover and continue cooking until the beans have softened to your liking, about 2 hours. Try to keep the pot at a low simmer rather than a boil. If you find the beans start to boil with the lid on, just remove the lid and stir often. Add additional water, if needed.

  3. Once the beans are cooked to your preference, add the balsamic vinegar and 1 tsp salt. Cook, uncovered, for 5 minutes. Add any additional salt to taste. Cook for another 20 minutes, if you want your beans thicker rather than soupy. Beans can be served right away, but for better flavor, turn off the heat and let them rest for a few hours or overnight. Reheat and finish off with a healthy drizzle of olive oil before serving.

You can use canned black beans instead of dried if you don’t have time to plan ahead. Sub four 12 oz cans (drained) for the dried beans and add 4 cups of water or enough to just cover the beans.

If you haven't ever cooked with dried black beans, please note that different varieties will lose a varying amount of their deep color. You haven't done anything wrong if your beans start to look reddish brown or even grey as they cook. They will darken as they sit/cool, but still may lose some of their black tone. They'll taste delicious either way. Personally, I’ve found Camellia brand dried beans best for maintaining color and cooking faster.


Grandma in Cuba - 1946

Grandma in Cuba - 1946

Grandma in Alabama - late 1990s

Grandma in Alabama - late 1990s

Cuban Black Bean
Print

Cuban Black Bean

Yield: 8 to 10
Author: Sarah Ward

Ingredients:

  • 3 tablespoons olive oil
  • 1 small sweet onion, diced
  • 1 bell pepper, diced
  • 1 head of garlic, peeled and minced (yes, for real; 2 if you’re a garlic lover, like me)
  • 3 cups dried black beans
  • 5 cups water
  • 3 tablespoons freshly ground cumin (4 Tbsp if using pre-ground)
  • 4 teaspoons dried oregano
  • 2 bay leaves
  • 6 tablespoons balsamic vinegar
  • 1 - 2 teaspoons kosher salt

Instructions:

  1. Heat the olive oil in a large pot over medium heat and add the onions, peppers and garlic. Sauté for about 5 minutes, just until the onions and peppers start to soften and release their juices. Add the ground cumin and continue sautéing for a couple of minutes.
  2. Add the beans, oregano, bay leaves and water. Stir until all of these ingredients are well combined. Reduce the heat to the lowest setting and slowly bring to a low simmer. Cover and continue cooking until the beans have softened to your liking, about 2 hours. Try to keep the pot at a low simmer rather than a boil. If you find the beans start to boil with the lid on, just remove the lid and stir often. Add additional water, if needed.
  3. Once the beans are cooked to your preference, add the balsamic vinegar and 1 tsp salt. Cook, uncovered, for 5 minutes. Add any additional salt to taste. Cook for another 20 minutes, if you want your beans thicker rather than soupy. Beans can be served right away, but for better flavor, turn off the heat and let them rest for a few hours or overnight. Reheat and finish off with a healthy drizzle of olive oil before serving.

Notes:

You can use canned black beans instead of dried if you don’t have time to plan ahead. Sub four 12 oz cans (drained) for the dried beans and add 4 cups of water or enough to just cover the beans. If you haven't ever cooked with dried black beans, please note that different varieties will lose a varying amount of their deep color. You haven't done anything wrong if your beans start to look reddish brown or even grey as they cook. They will darken as they sit/cool, but still may lose some of their black tone. They'll taste delicious either way. Personally, I’ve found Camellia brand's dried beans best for maintaining color. Traditionally, these beans are served over white rice with fried sweet (ripe) plantains, green salad or fresh cabbage, roasted Cuban style pork and mojo covered yuca. If you forgo the whole feast, I suggest at least serving with plantains or salad, but definitely over rice.

Calories

336.78

Fat (grams)

6.72

Sat. Fat (grams)

1.02

Carbs (grams)

54.24

Fiber (grams)

12.44

Net carbs

41.81

Sugar (grams)

5.89

Protein (grams)

16.95

Sodium (milligrams)

417.25

Cholesterol (grams)

0.00
Did you make this recipe?
Tag @ofthedirt on instagram and hashtag it #ofthedirtrecipes
Created using The Recipes Generator
In Entree, Recipe, Vegan, Vegetarian, Heirloom Recipes Tags Black Beans, Cuba, Heirloom Recipe, vegetarian, vegan, food, authentic cuban black beans, cuban black beans
2 Comments
 

of the dirt blog

I believe there is a necessity for us to be connected to our food. It makes us aware of seasons and life cycles. It reminds us that vital functions on earth are unplugged. It gives us a unique way to express creativity and build community. I hope the recipes and thoughts shared here Inspire you to make something delicious for someone you love (or just yourself!).


BLOG AUTHOR

Sarah Ward is the Editor of Taste of the South magazine. Currently enjoying life in Birmingham, AL with her husband and their polydactyl cat, Jack.

Sarah Ward is the Editor of Taste of the South magazine. Currently enjoying life in Birmingham, AL with her husband and their polydactyl cat, Jack.


search for recipes


Follow @ofthedirt on instagram

This weekend, a group of friends and talented bakers held another bake sale. With a short 7 days of planning and 4 days of advertising, this small group of kickass women raised over $1,000 selling hand pies, cookies, and pastries. To everyone who sup
🎉GIVEAWAY!!! Want to win a free box of homemade pastries?! There are a few ways to win: 

Birmingham Locals: 
1. Tag your local friends below and spread the word about our bake sale fundraiser. Each tag is an entry. TWO winners will be chosen tomorr
HAPPY FALL!!!!!!! It’s my favorite time of year and for the first time that I can remember, it actually feels like fall outside in Alabama! To celebrate, make a batch of these Pumpkin Oatmeal Chocolate Chunk Cookies...they use a whole jar of @t
It was 68 degrees here today and everyone was hoarding the fall products at Trader Joe’s yesterday (I actually witnessed a woman frantically grab 6 hand soaps, 5 candles, and 3 of every pumpkin-filled-treat thing they had). BUT I’ve got o
Quick pickles are one of the best flavor tools to keep on hand. They brighten up any dish - eggs, tacos, toast, salads, chili, sandwiches, pretty much anything that goes with vinegar. And, they’re so easy to make! (You don’t really even n

Let's Keep in Touch!

Get new recipes delivered right to your email. 

Thank you! Looking forward to staying in touch.

For now, head on over and say hi here. 

© Sarah Ward and of the dirt, 2017. Unauthorized use and/or duplication of the photographs and recipes without express and written permission from this blog’s author and/or owner is strictly prohibited. Excerpts and links may be used, provided that full and clear credit is given to Sarah Ward and of the dirt with appropriate and specific direction to the original content.